


 0 articles -
 Hi!
It has been added 🙂
Some links in this post are part of the Amazon Affiliate Program.
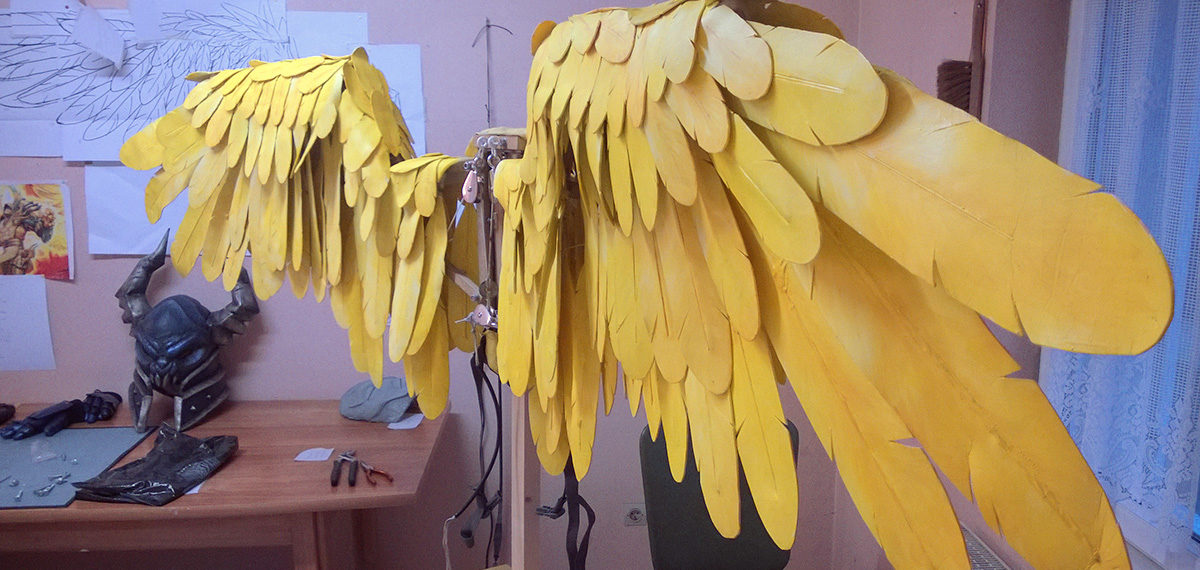
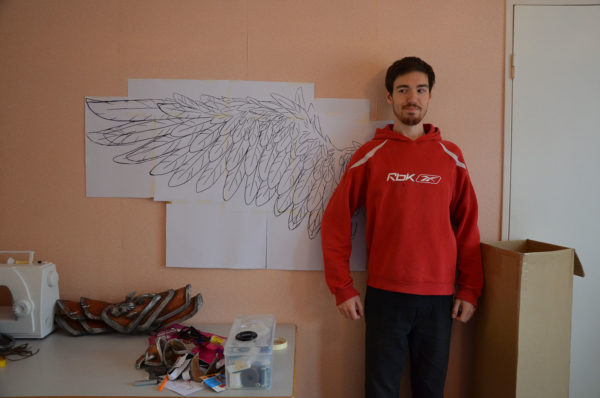
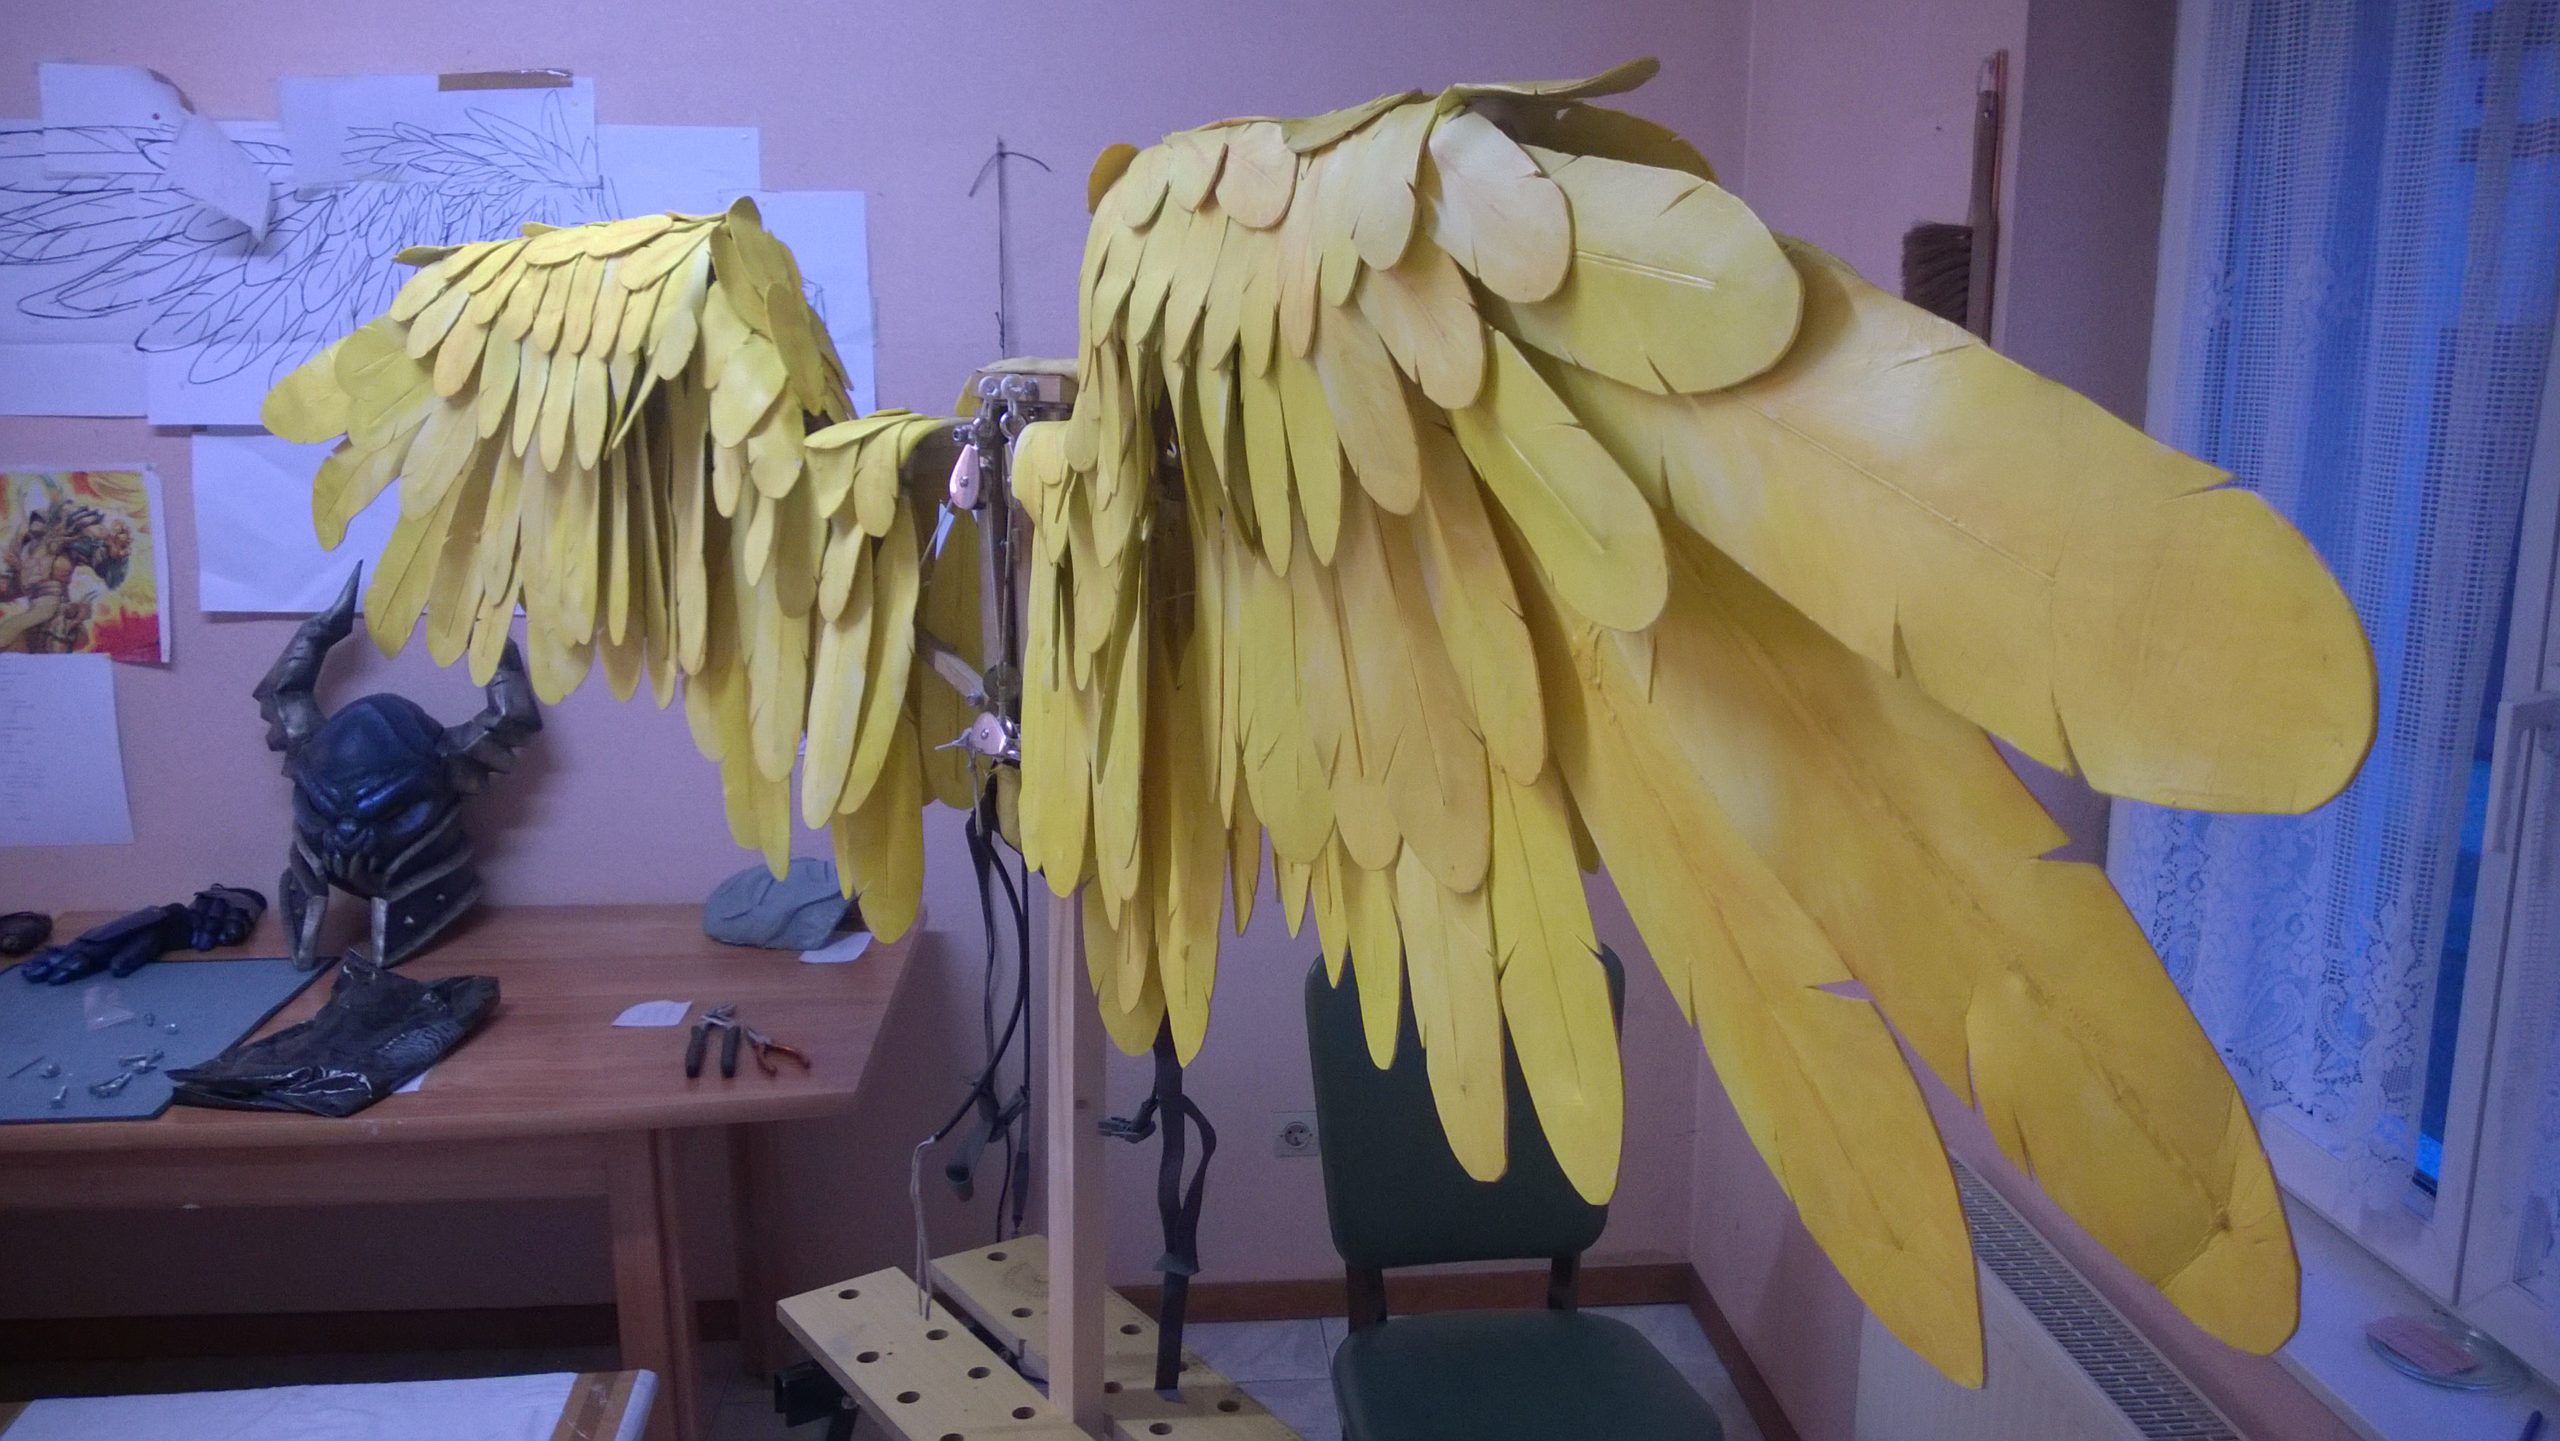
To build my Guardian of Kings costume, I HAD to have wings; and for good measure, they HAD to open.
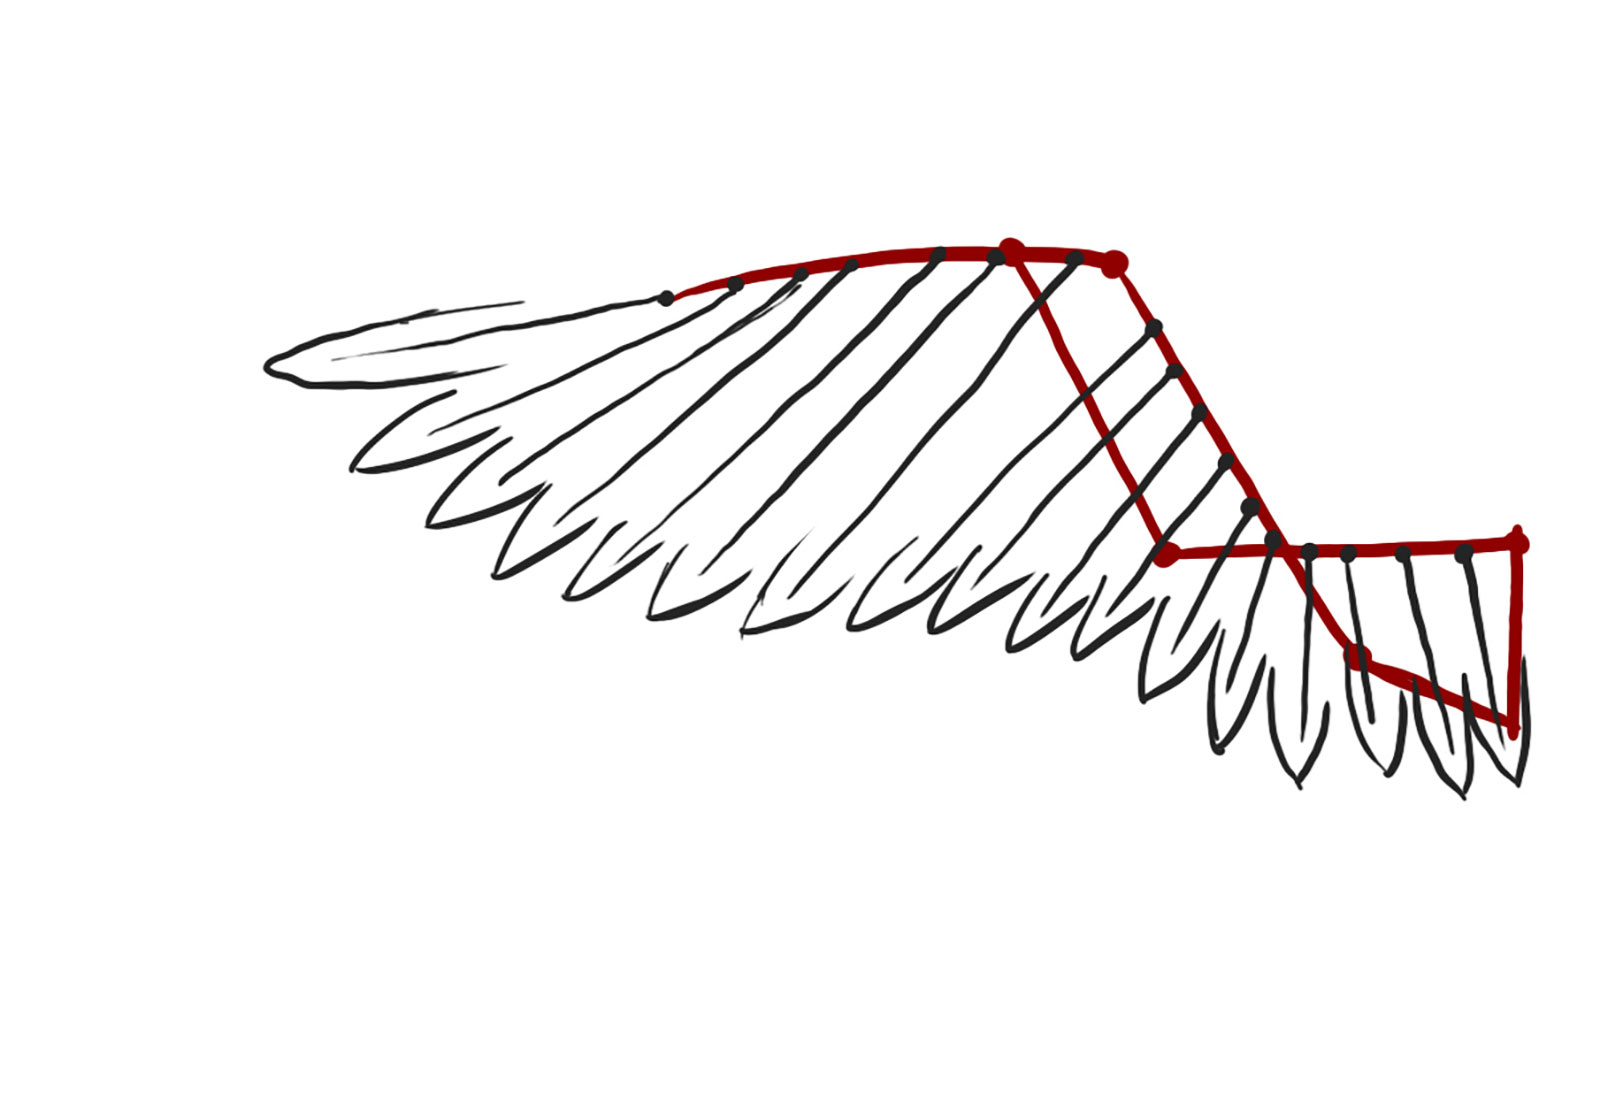
The biggest challenge was to give a “Woah” effect to the costume, like a peacock showing off his plumage. To achieve that, the motion of the mechanism imitates a real eagle wing, which looks pretty close to what people picture in their head when they think about angel wings.
I had the choice to automate the wings so they would open with a remote trigger or create a system to open them by hand.
For automated systems, there were two possibilities: use electrical motors or a pneumatic system.
Electrical motors allow for total control over the speed of the wings as well as different angles while opening the wings to give a natural feeling of a bird movement.
The main drawback of this solution is the combined weight of motors, batteries and all the steel elements used in the system. If the wings were the only prop on the costume it would have been okay-ish, but if you add to this a full armor and a sword, it becomes a bit too heavy to wear.
The pneumatic system on the other hand allows for a quick opening of the wings. The portability and autonomy of the system are rather good. But the required pieces were hard to find, so they would not have been cheap for me. Additionally I had my doubts that the security checks would let me through while I had air tanks attached to my waist.
Because no automatic solution was good enough, I went to see what was possible on the side of manual systems.
I quickly realized that with a manual system, all you need is figure out one thing: which one of your joints will power up your great invention!
Generally the most practical solution is to use an arm, preferably a free one. Of course it would be possible to use a leg, a foot, your neck and so on, but that would be looking for trouble!
In my case, I wanted a length of course small enough so I didn’t have to move my arm too far to open the wings. For this, I drew an unfolding mechanism and attached a cord and pulleys to it. And there I have to be honest and admit that I got very lucky: the course was almost perfectly right at the first try :p .
Before building our wing, we have to figure out what we’re building.
In the beginning, a pivot/slide system seemed like a good solution, but the practical build of this would have been quite the difficult task. To be sure not to mess up, I cut some cardboard pieces and put them together with metal wire.
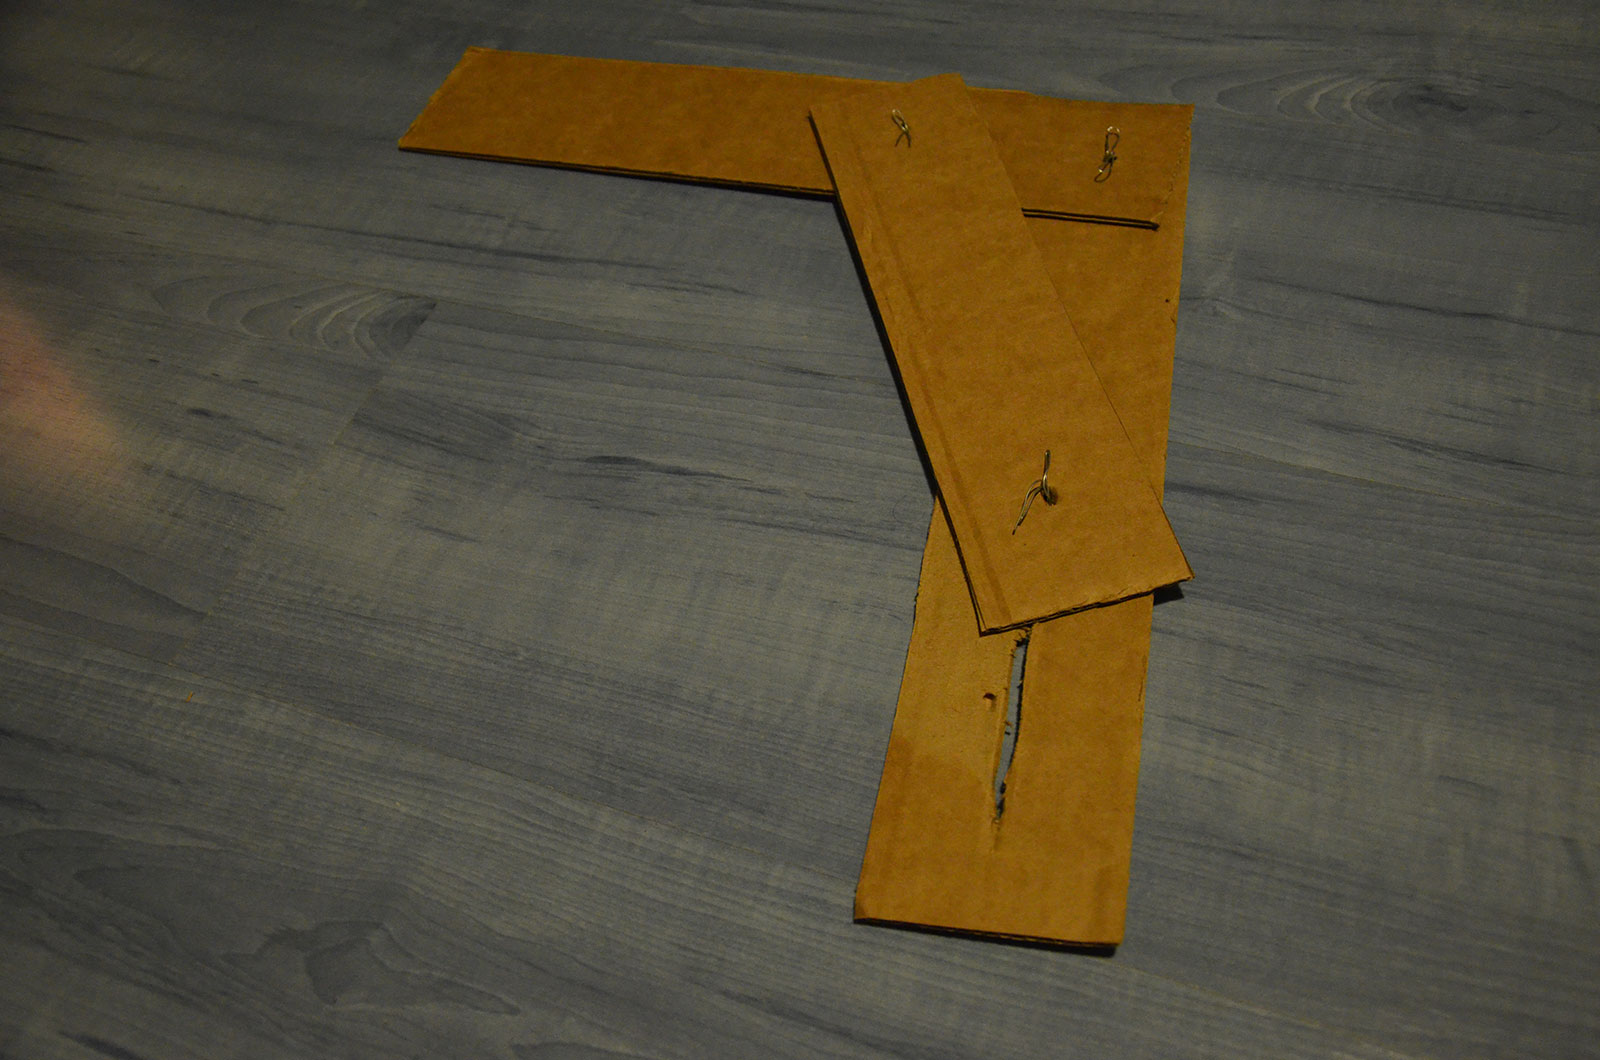
I then tried a system with pieces put end-to-end, maintained parallel by doubling the middle piece.
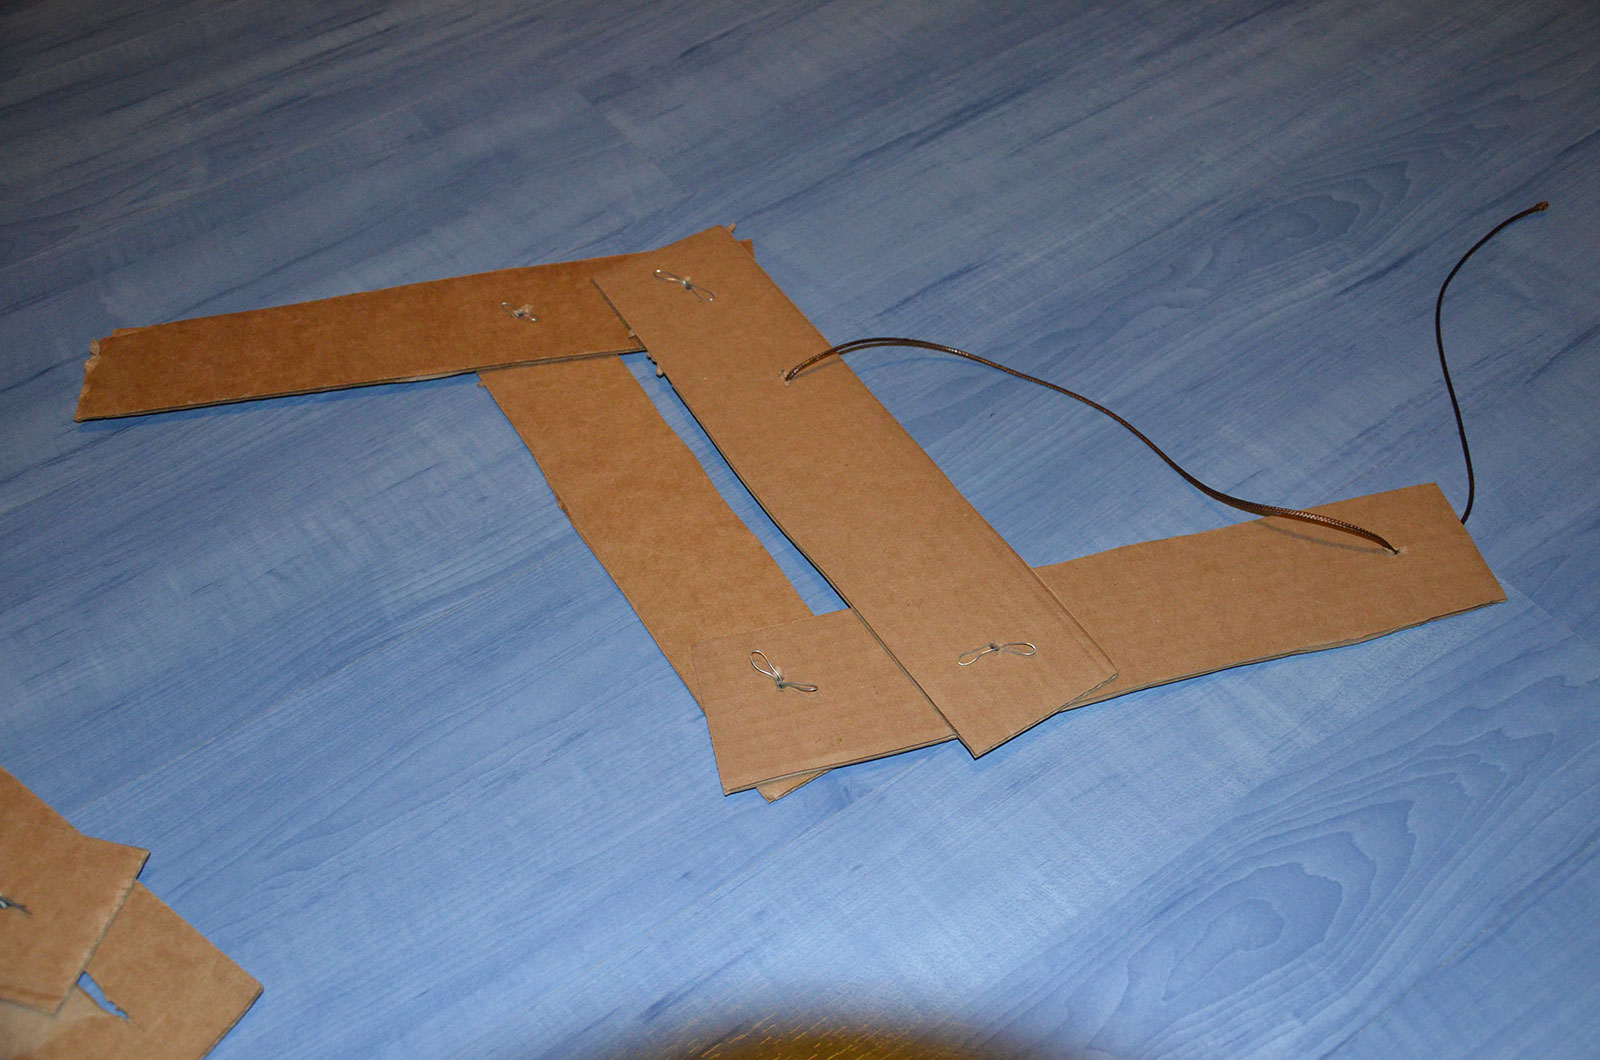
The movement is limited but good enough.
The best would have been a secondary course angle for the back and forth, but it was too complicated to implement. So I let the movement free and put simple minimum-maximum stops to set the course (see further below).
I then looked for a way to attach the feathers. There is pretty much an infinity of possibilities when tackling this step. The one that seemed the most practical and also the most common was using a wire connecting all the feather of a same row, that will let you set precisely the angle between each of them when the wing is open (visible on Mashayahana’s tutorial photo on DeviantArt).
So when the wing is at rest, the wire is not stretched and the feathers just drop naturally toward the floor. When the mechanism is activated, the first feather, tightly fixed to the structure will pull the wire, which will then pull on the second feather, which will then pull on the next and so on until all the feathers of the row are unfolded.
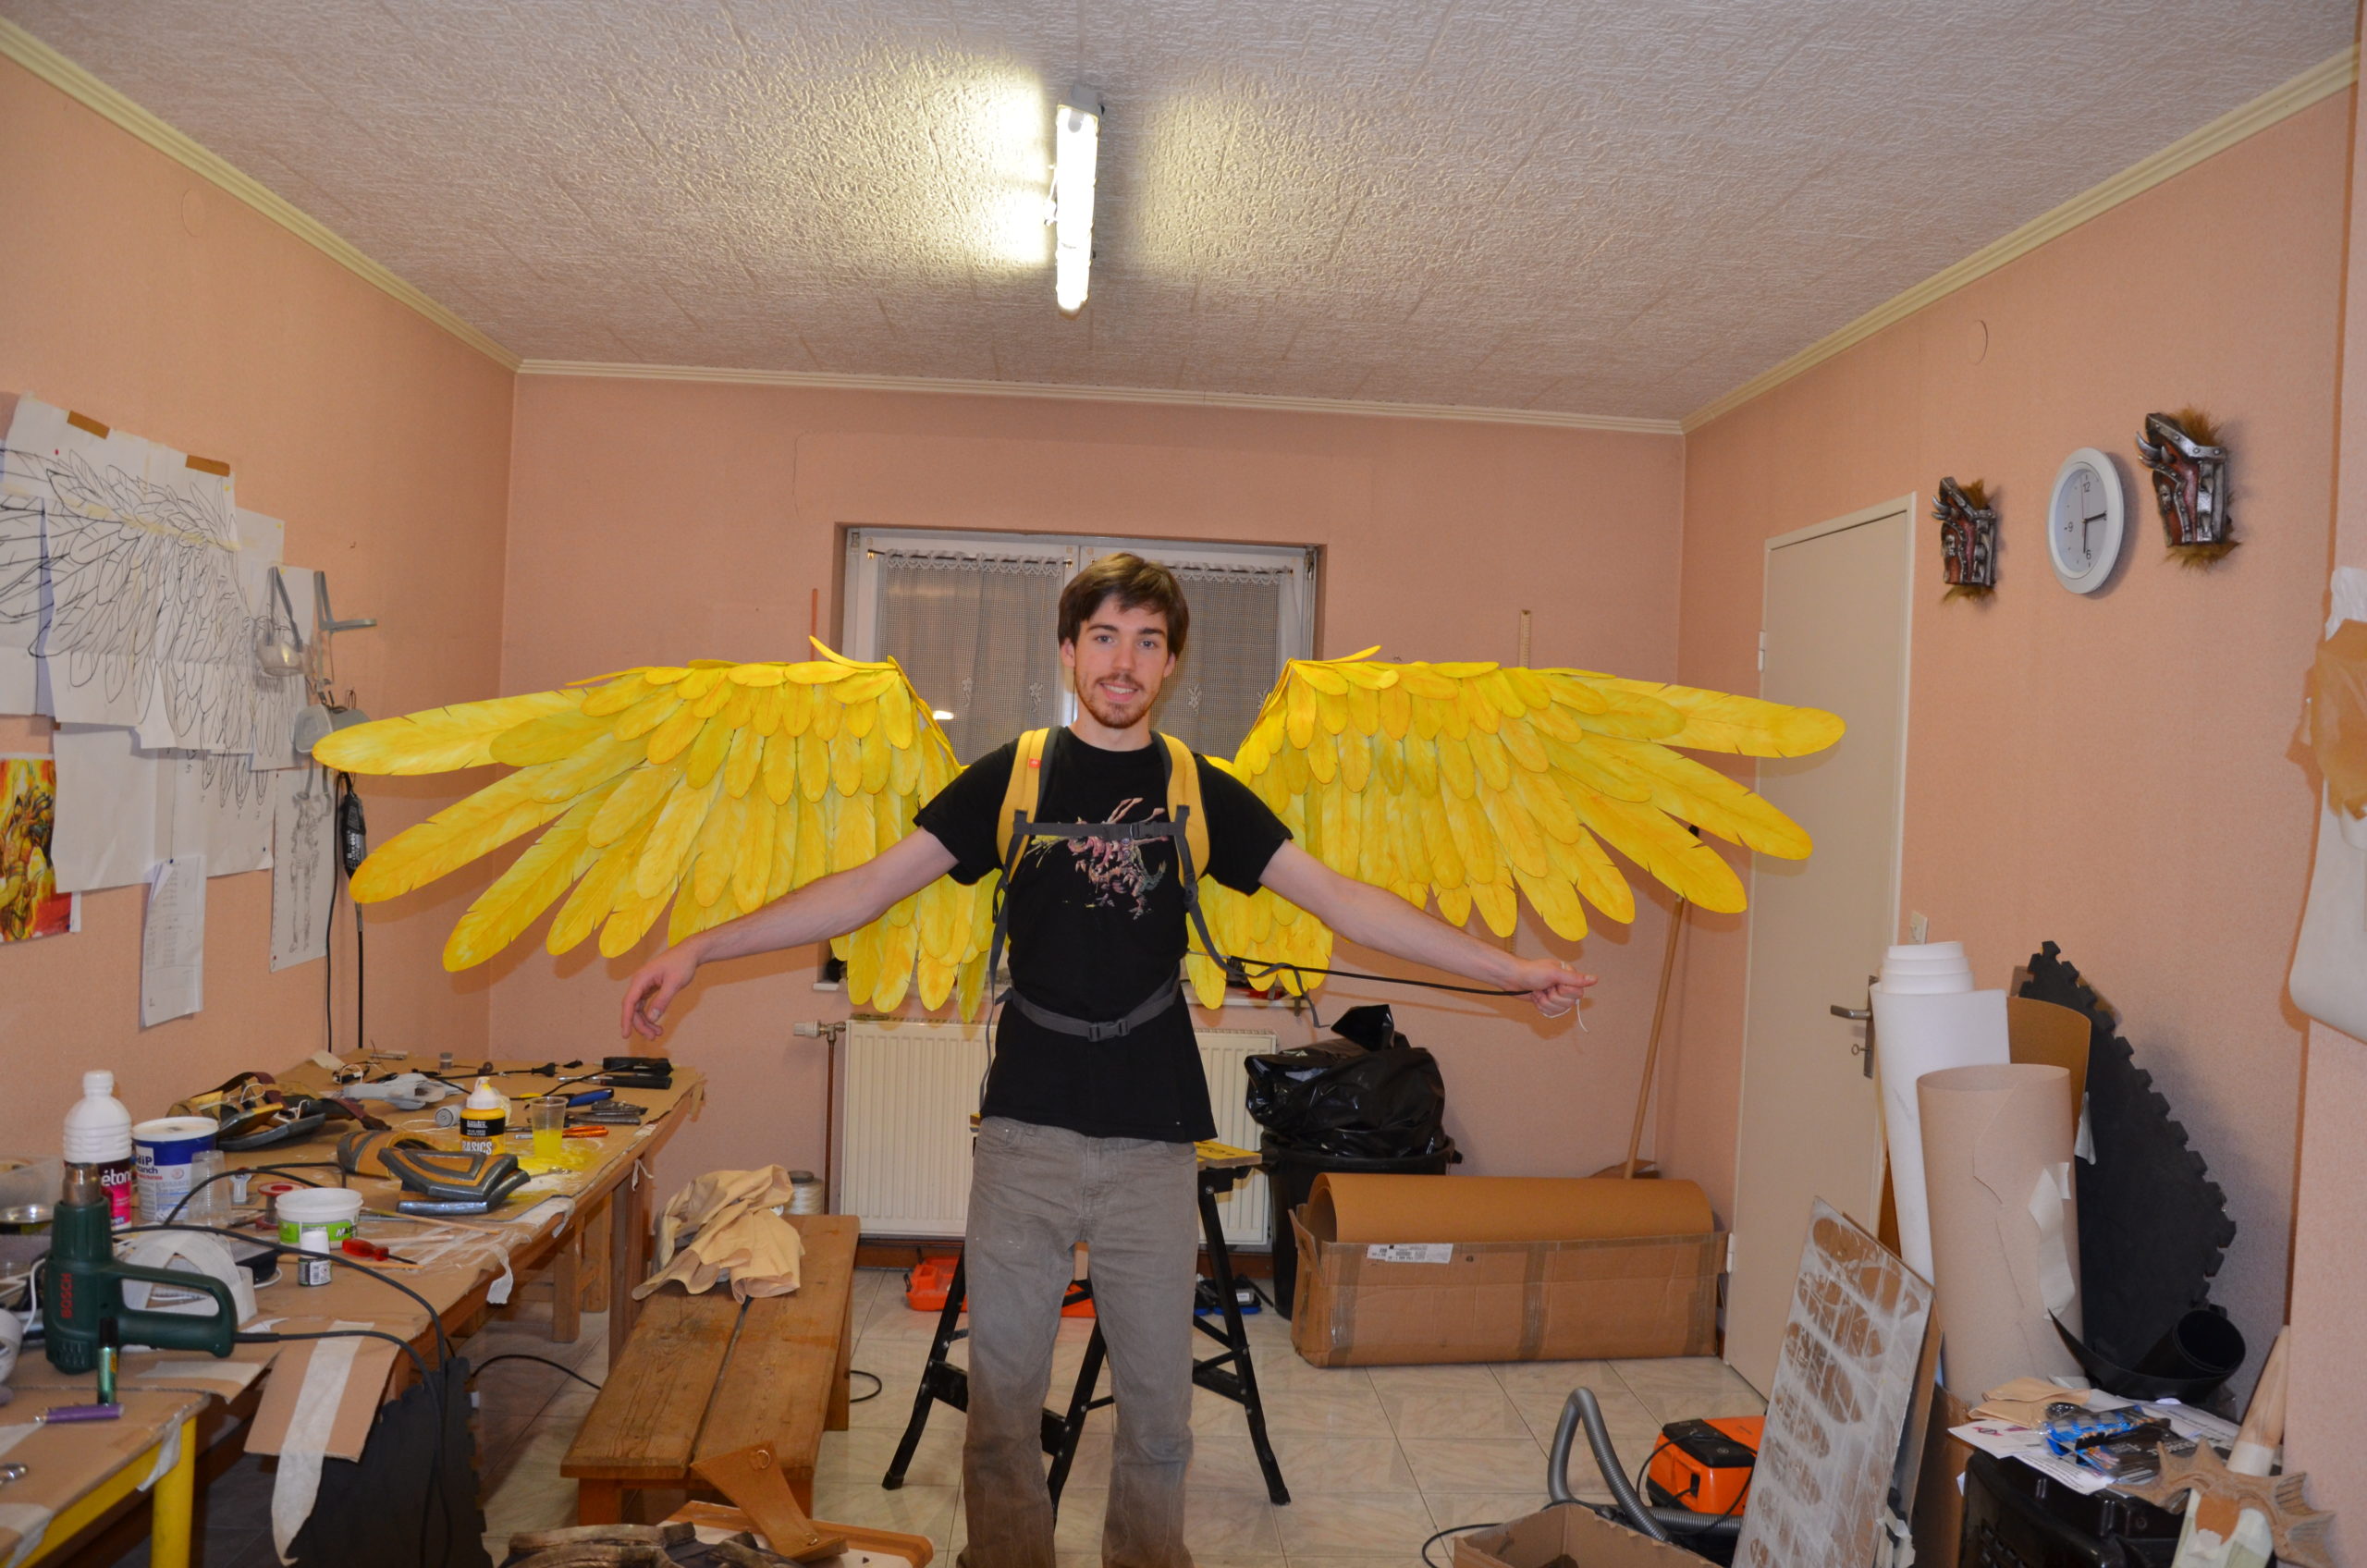
Another question was the back anchor point. The most obvious solution was using a harness, or a backpack. In the end I chose a backpack that I pretty much turned into a harness…
The last problem to solve was finding the right material for the feathers, and how to make them. Once again, a lot of possibilities, from fabric to foam, even real feathers. But the price fluctuated a lot between each of them…
I went for the “foam, wood, wire, glue” solution to get a feather that is flexible and light. The painting was a bit harder to figure out because of said flexibility, but we got pretty good results using “Dip”, a flexible and waterproof paint.
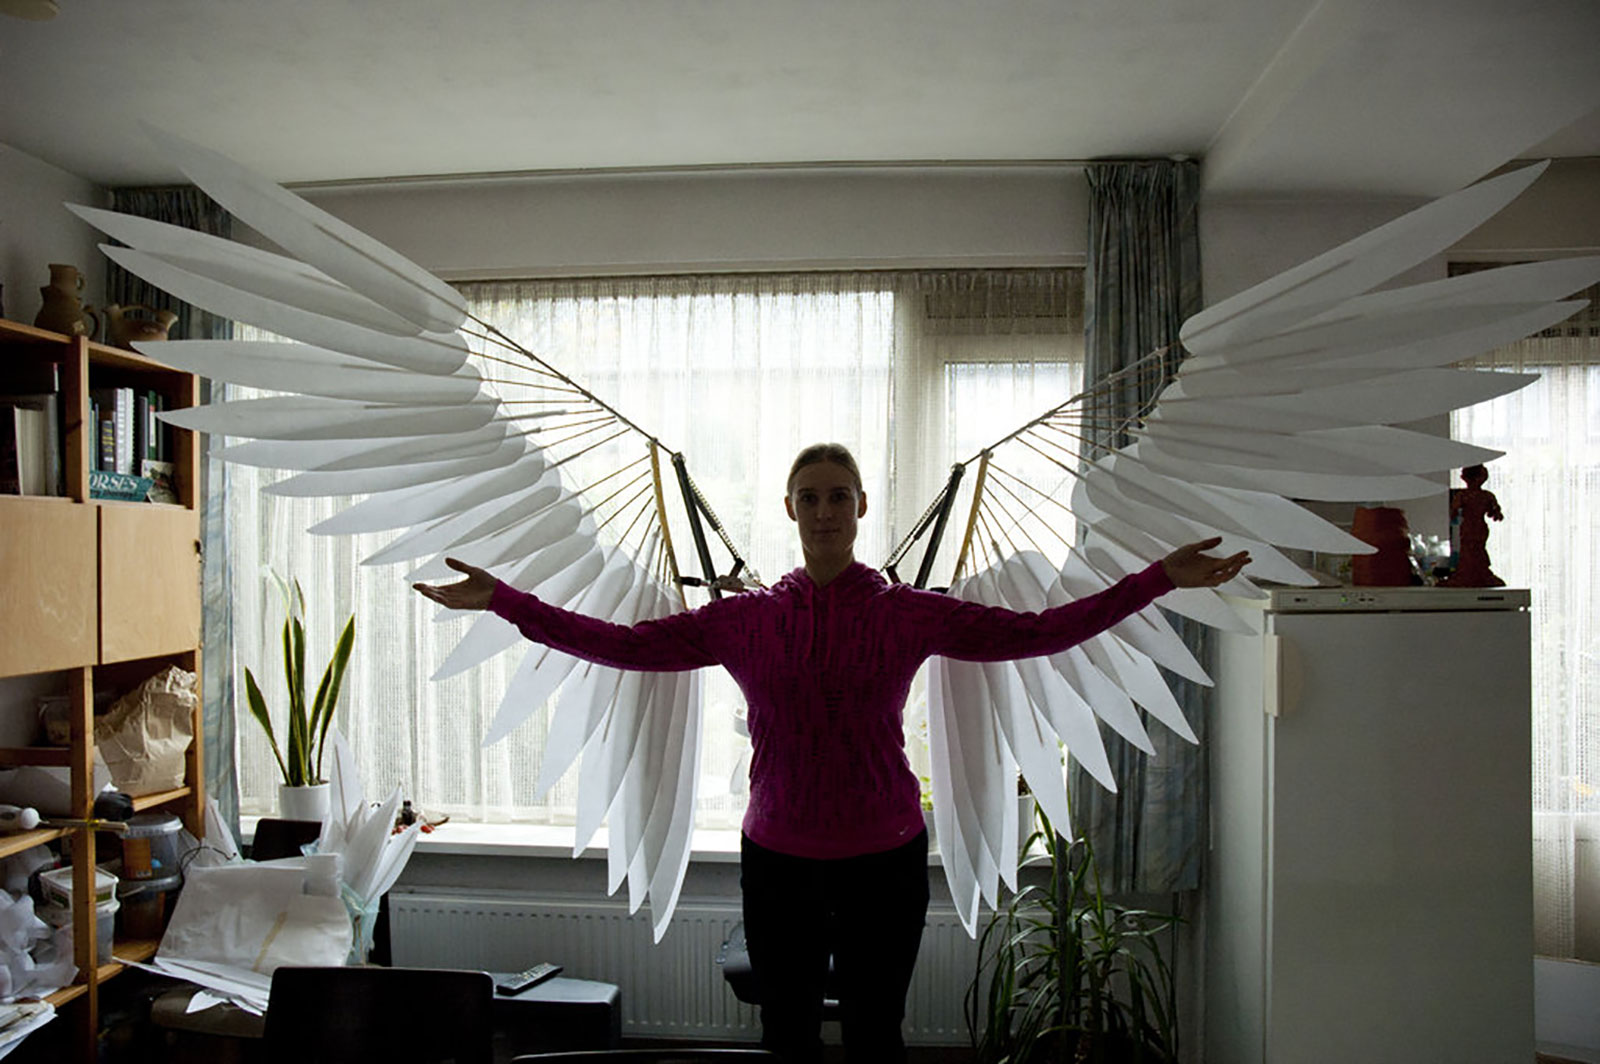
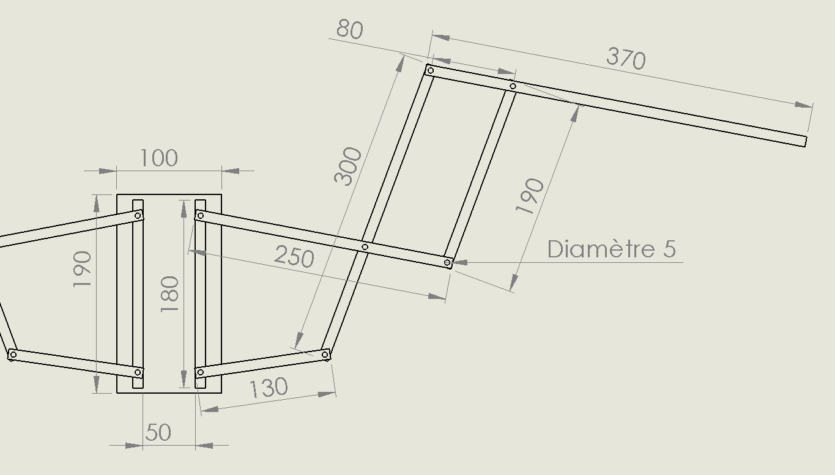
To figure out the length of each feather, I drew a prototype on SolidWorks in an articulated assembly. It proved quite hard to set all the lengths right so that the wings would fold back on themselves nicely and still have a good look when they were open.

The first prototype was made out of bamboo. I thought it was light, and robust enough to hold all the feathers, but it turned out to be brittle and not very durable.

It was still useful. It confirmed that the general mechanism was good. And that with some adjustments to the length of the wood pieces, the feel was the right one.
For the backpack, it was initially supposed to keep the “carry objects” function, but when the costume was on, the width of the backpack made me look crooked and kinda weird. So we removed the extra width, and just cut pretty much all the pockets, since they were just useless in the end.
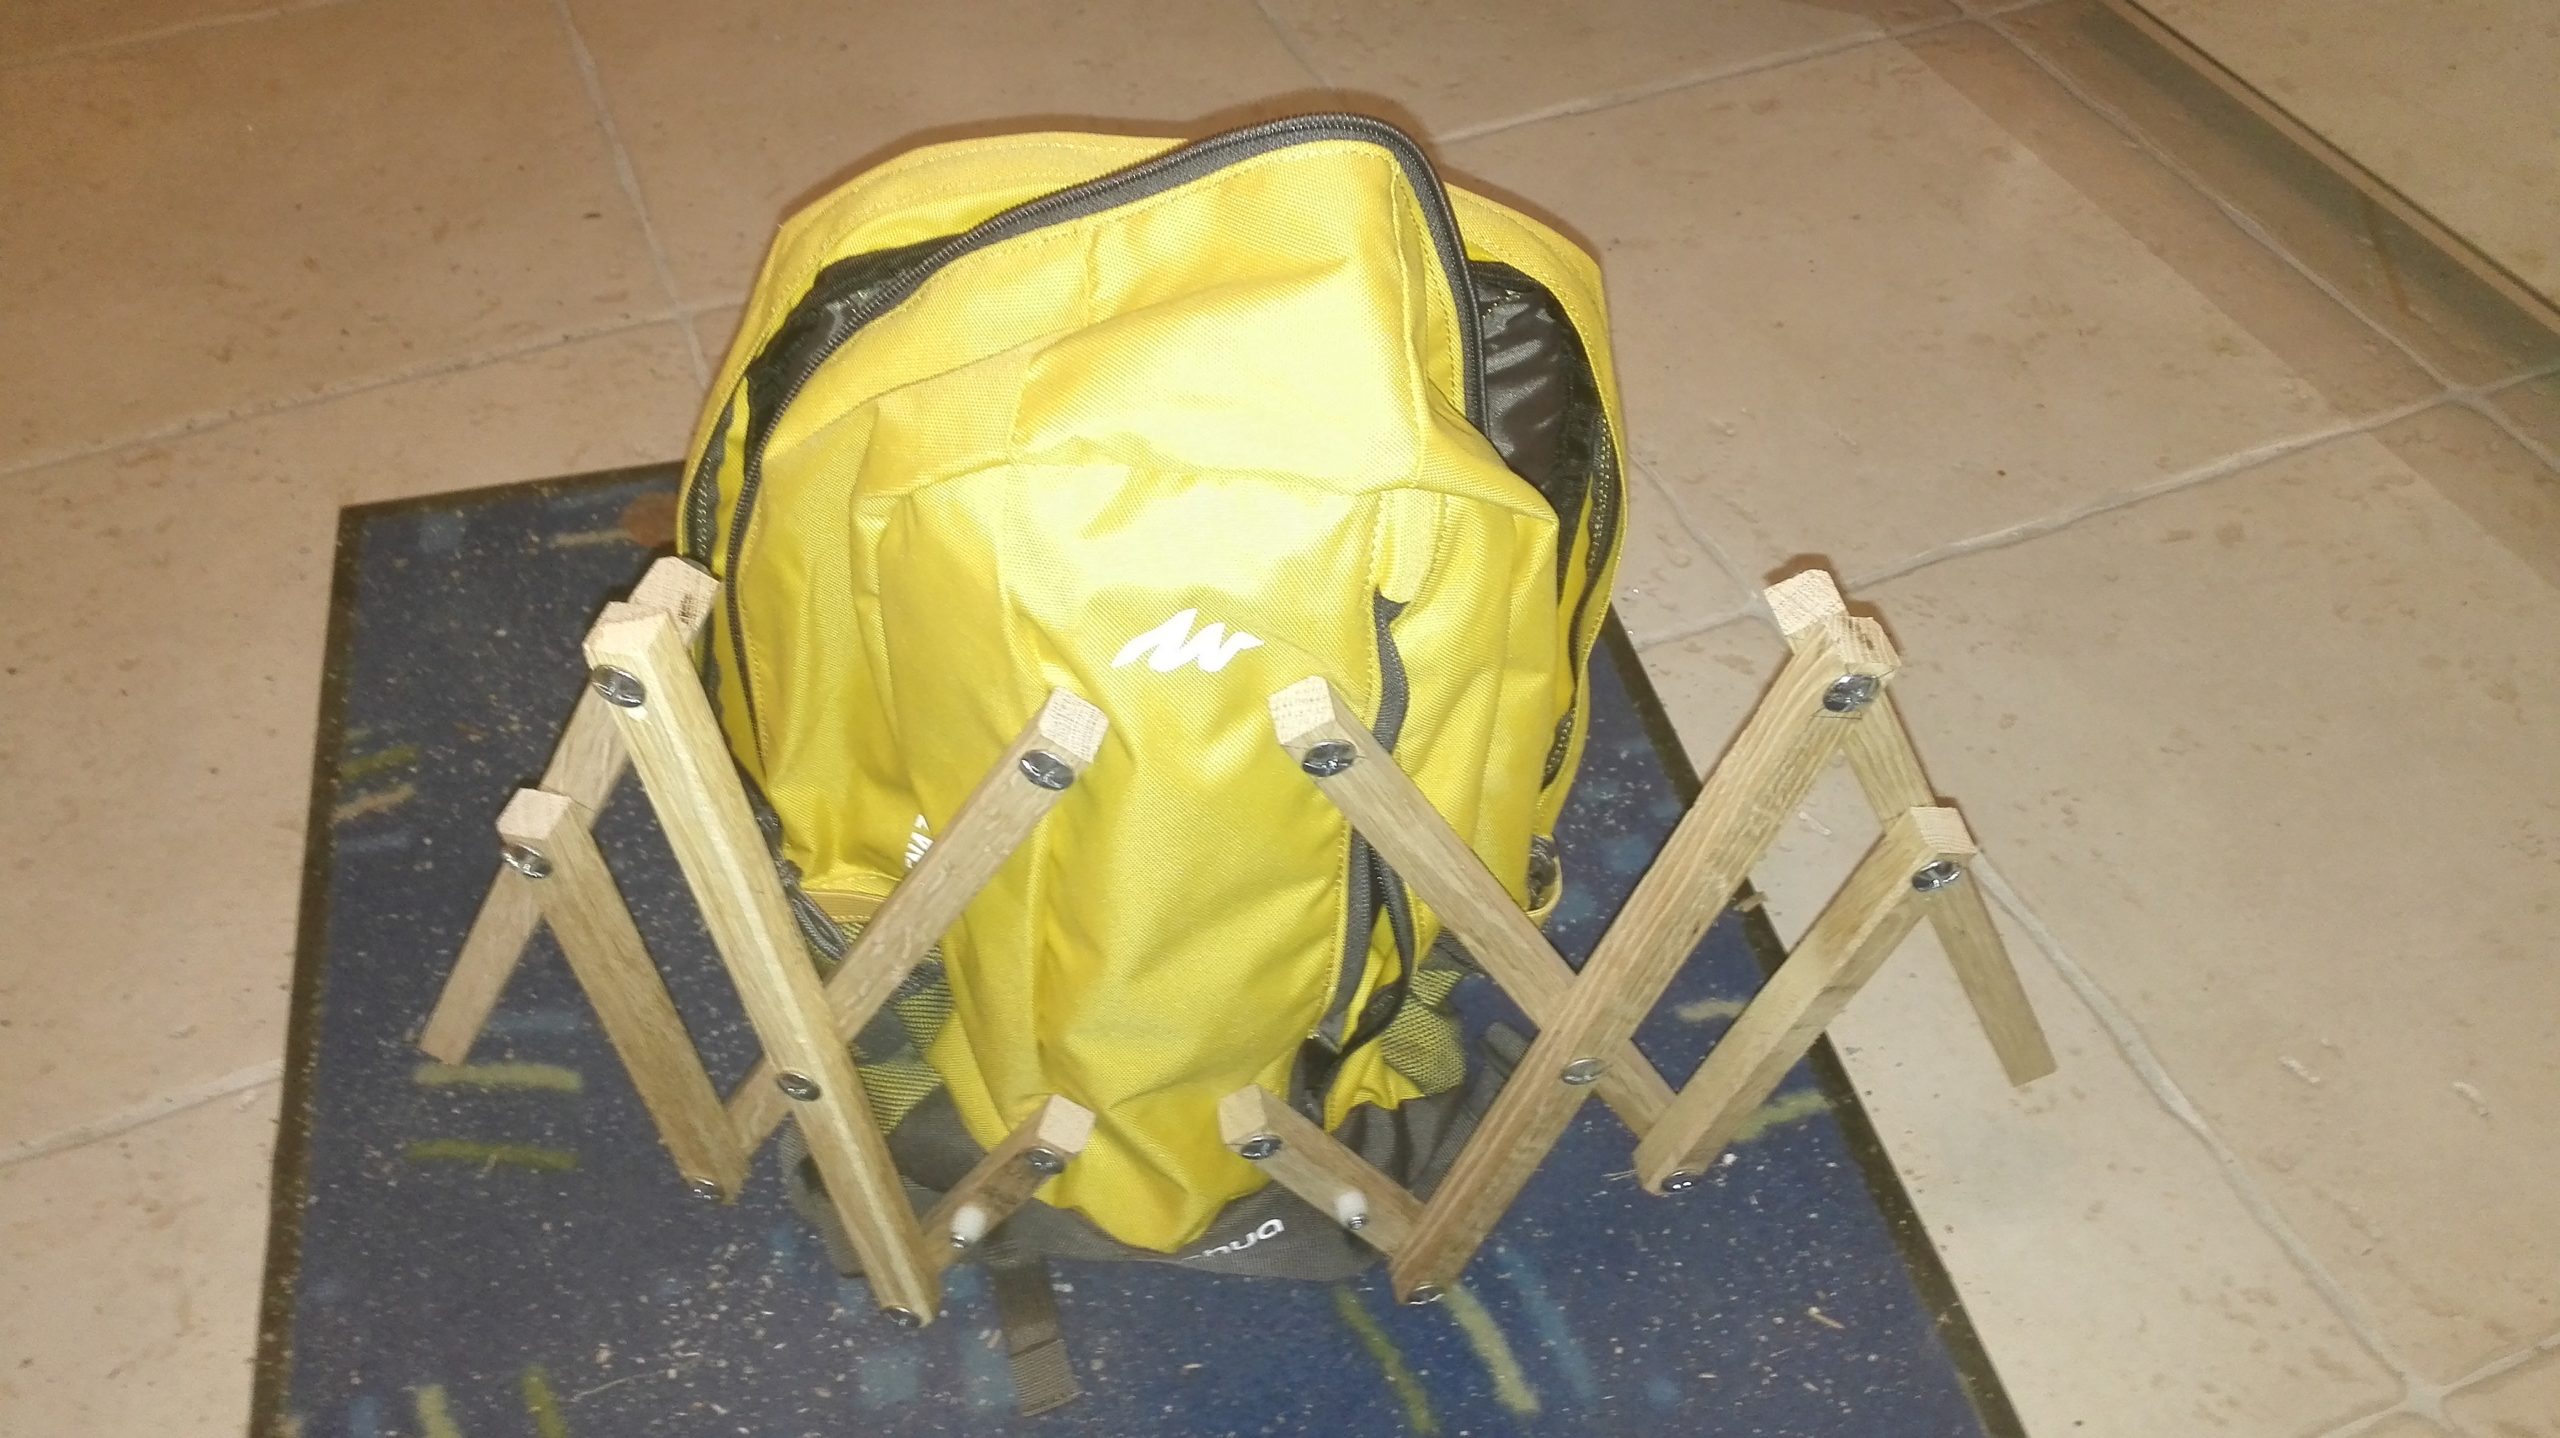
The bag was bought at a sports shop for 10€. It is basic but efficient because the straps are padded and comfortable for the shoulders, and it has two straps on the front for stabilization, which is very practical.
A wooden plank the same height as the bag’s is attached to the back. It will be the base on which the whole wing mechanism will be fastened. It is screwed in with very large washers so it doesn’t tear the fabric.
On top of the plank, two wooden cleats are screwed: one at the top, one at the bottom. On each of them we place two pivot. You just have to put a wood piece between them now and they will be able to pivot back and forth, just like we saw in the “research” section.
It’s on this wood piece that the whole wing will come on each side. So we pierce two holes in each of them.
Now we go for the wings. To do this, simply cut the wooden bars (in my case oak 20mm wide, very solid) to the length that has been defined on SolidWorks, drill the holes (preferably with a pillar drill for better accuracy), and assemble these pieces together with screws / washers / nuts (SWN).
The nuts must not be tightened otherwise the entire mechanism is fixed; Therefore, in order to prevent them from being unscrewed and go for a walk while you are showing off, locknuts are used, which remain in place even when they are not tightened.
Tip: if like me you are fumbling with your system and often have to disassemble / reassemble, first use regular nuts which are much easier to screw / unscrew than the locknuts. Locknuts need to be screwed with a wrench from the beginning, which wastes a lot of time in the long run. Also, the plastic ring gets damaged and becomes almost ineffective.
The wings can now be attached to the bag using SWNs. These screws are very long because they will serve as the “stops” on the wooden plate at the base of the bag and thus stop the course from the wings to the front.
Now that the skeleton is in place, we will install all the mechanism to open the wings with the arm.
Three hooks are driven into the wooden cleats, two at the top and one at the bottom. There will be a pulley attached on each, and through each a string will pass.
This string is first attached to the lowest point of the wing (a simple wooden screw is enough), it then passes into the pulley which is on its side, and is tied to a ring. Another string does the same on the other side. A third one goes from the ring and passes into the lower pulley, it then becomes the handle to unfold the wings. These two strings are therefore driven by a single handle. They must be perfectly adjusted to trigger the opening of their respective wing at the same time. The slightest shift will be felt when pulling the string by an unpleasant jerk.
Good, our wing bag is now functional. We must now prepare him to receive our innumerable feathers. They are arranged in superimposed rows, with the main row in the middle, surrounded by two secondary rows, one on each side.

For the main row, 14 holes are drilled vertically into the wooden skeleton, one for each feather, uniformly distributed along the wing.
For the secondary rows it’s a little different. The mechanism being on two layers of wood, I hooked laterally to shift the base of the feathers when necessary. Otherwise, I used simple wood screws. Again, it is necessary to distribute the holes along the length of the wing and to be symmetrical.
The bag is ready to receive the feathers, which will constitute our next step and is also the most tedious part.
What you need:
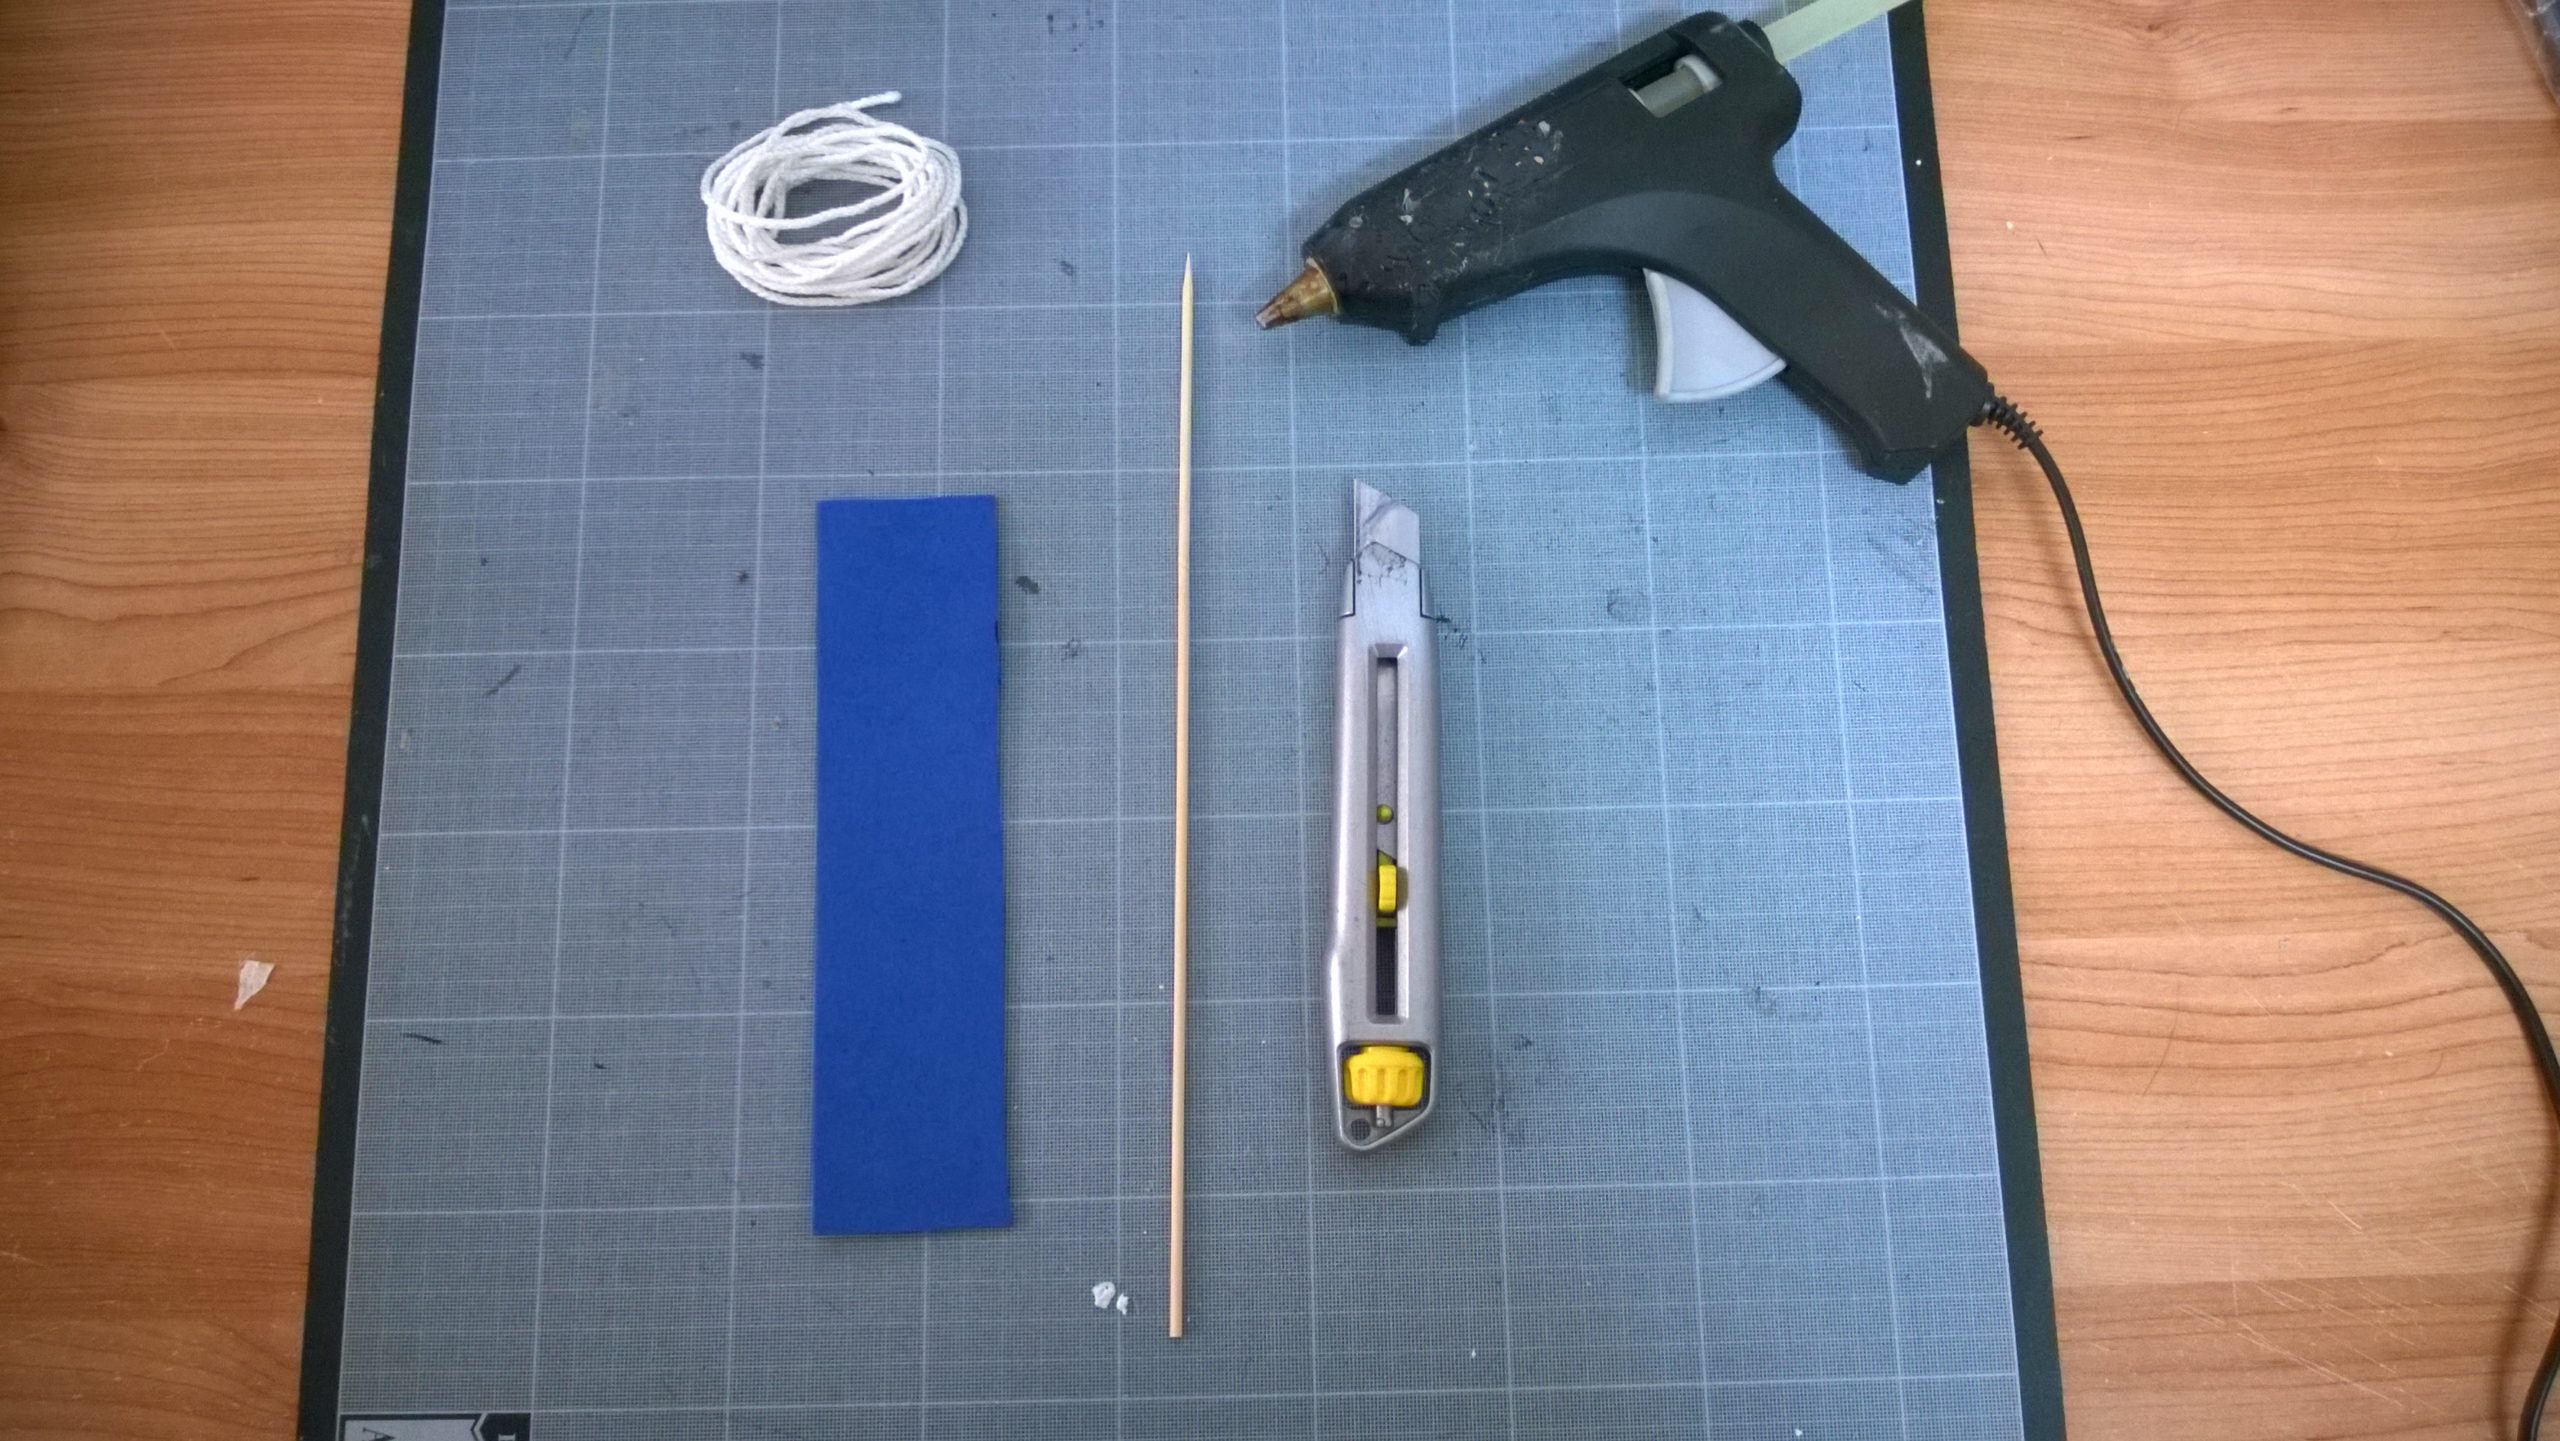
For the material I decided to use foam sheets because it is inexpensive, easy to work with and quite rigid.
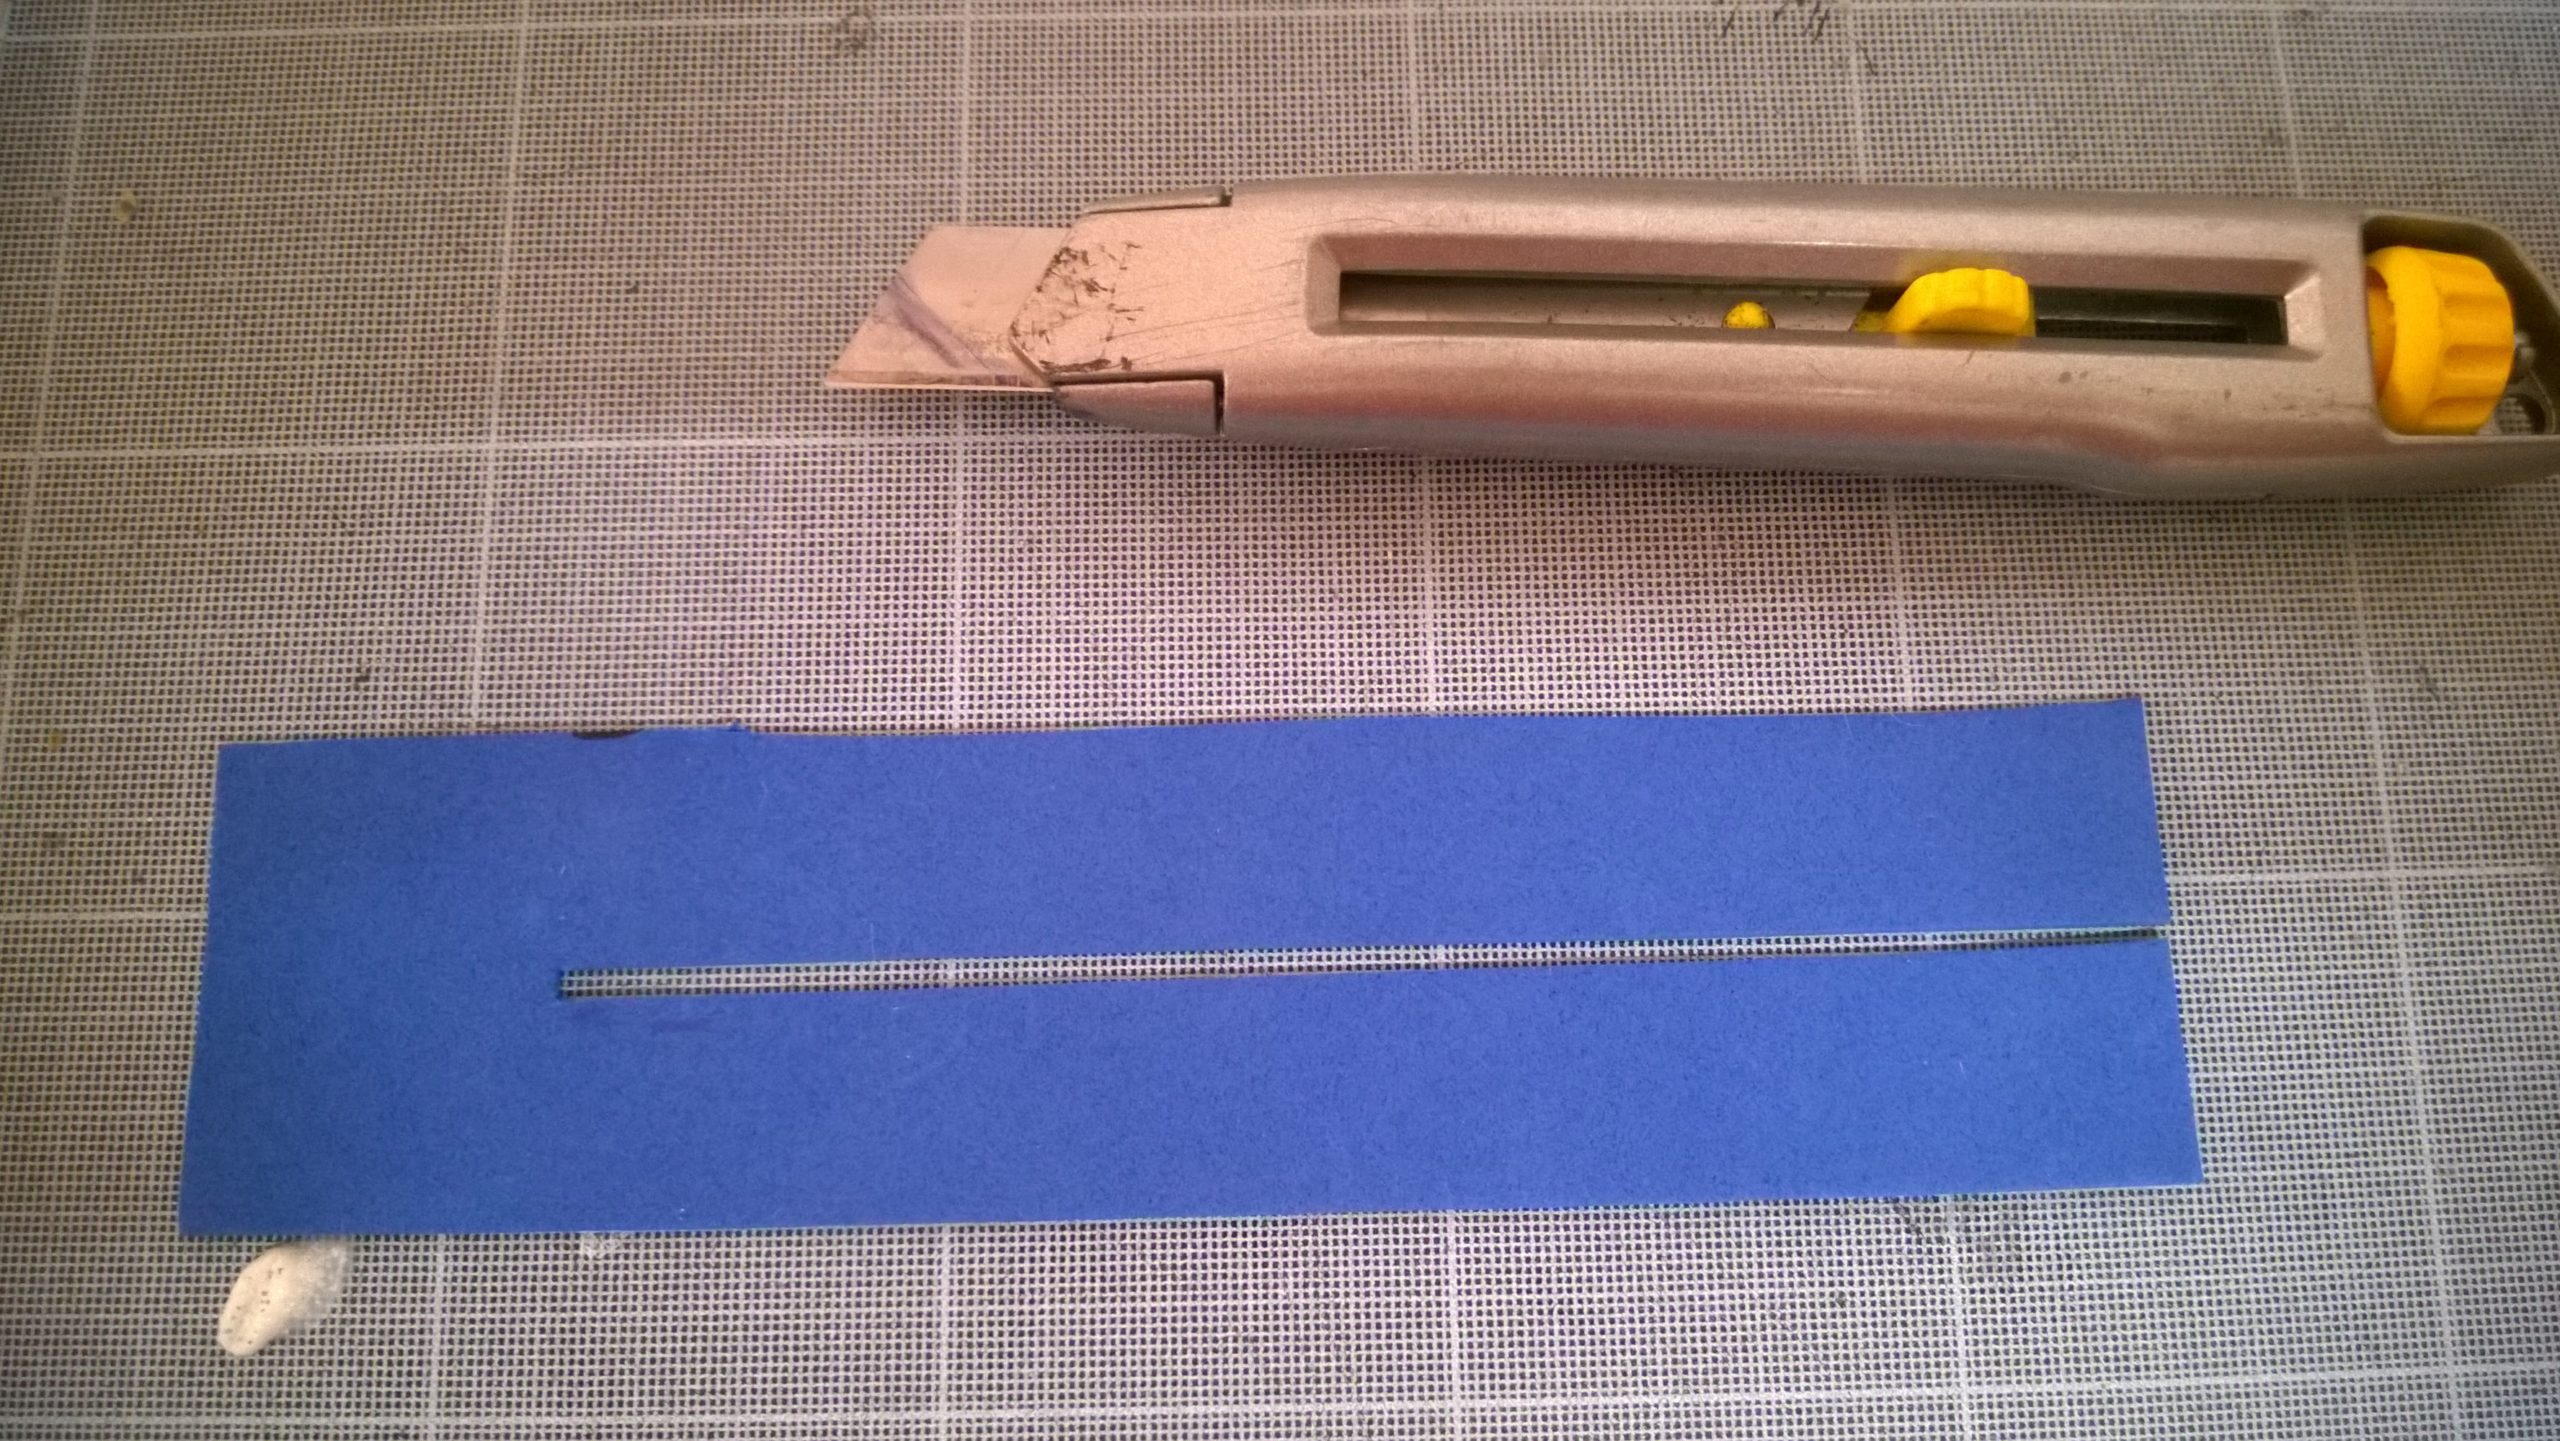
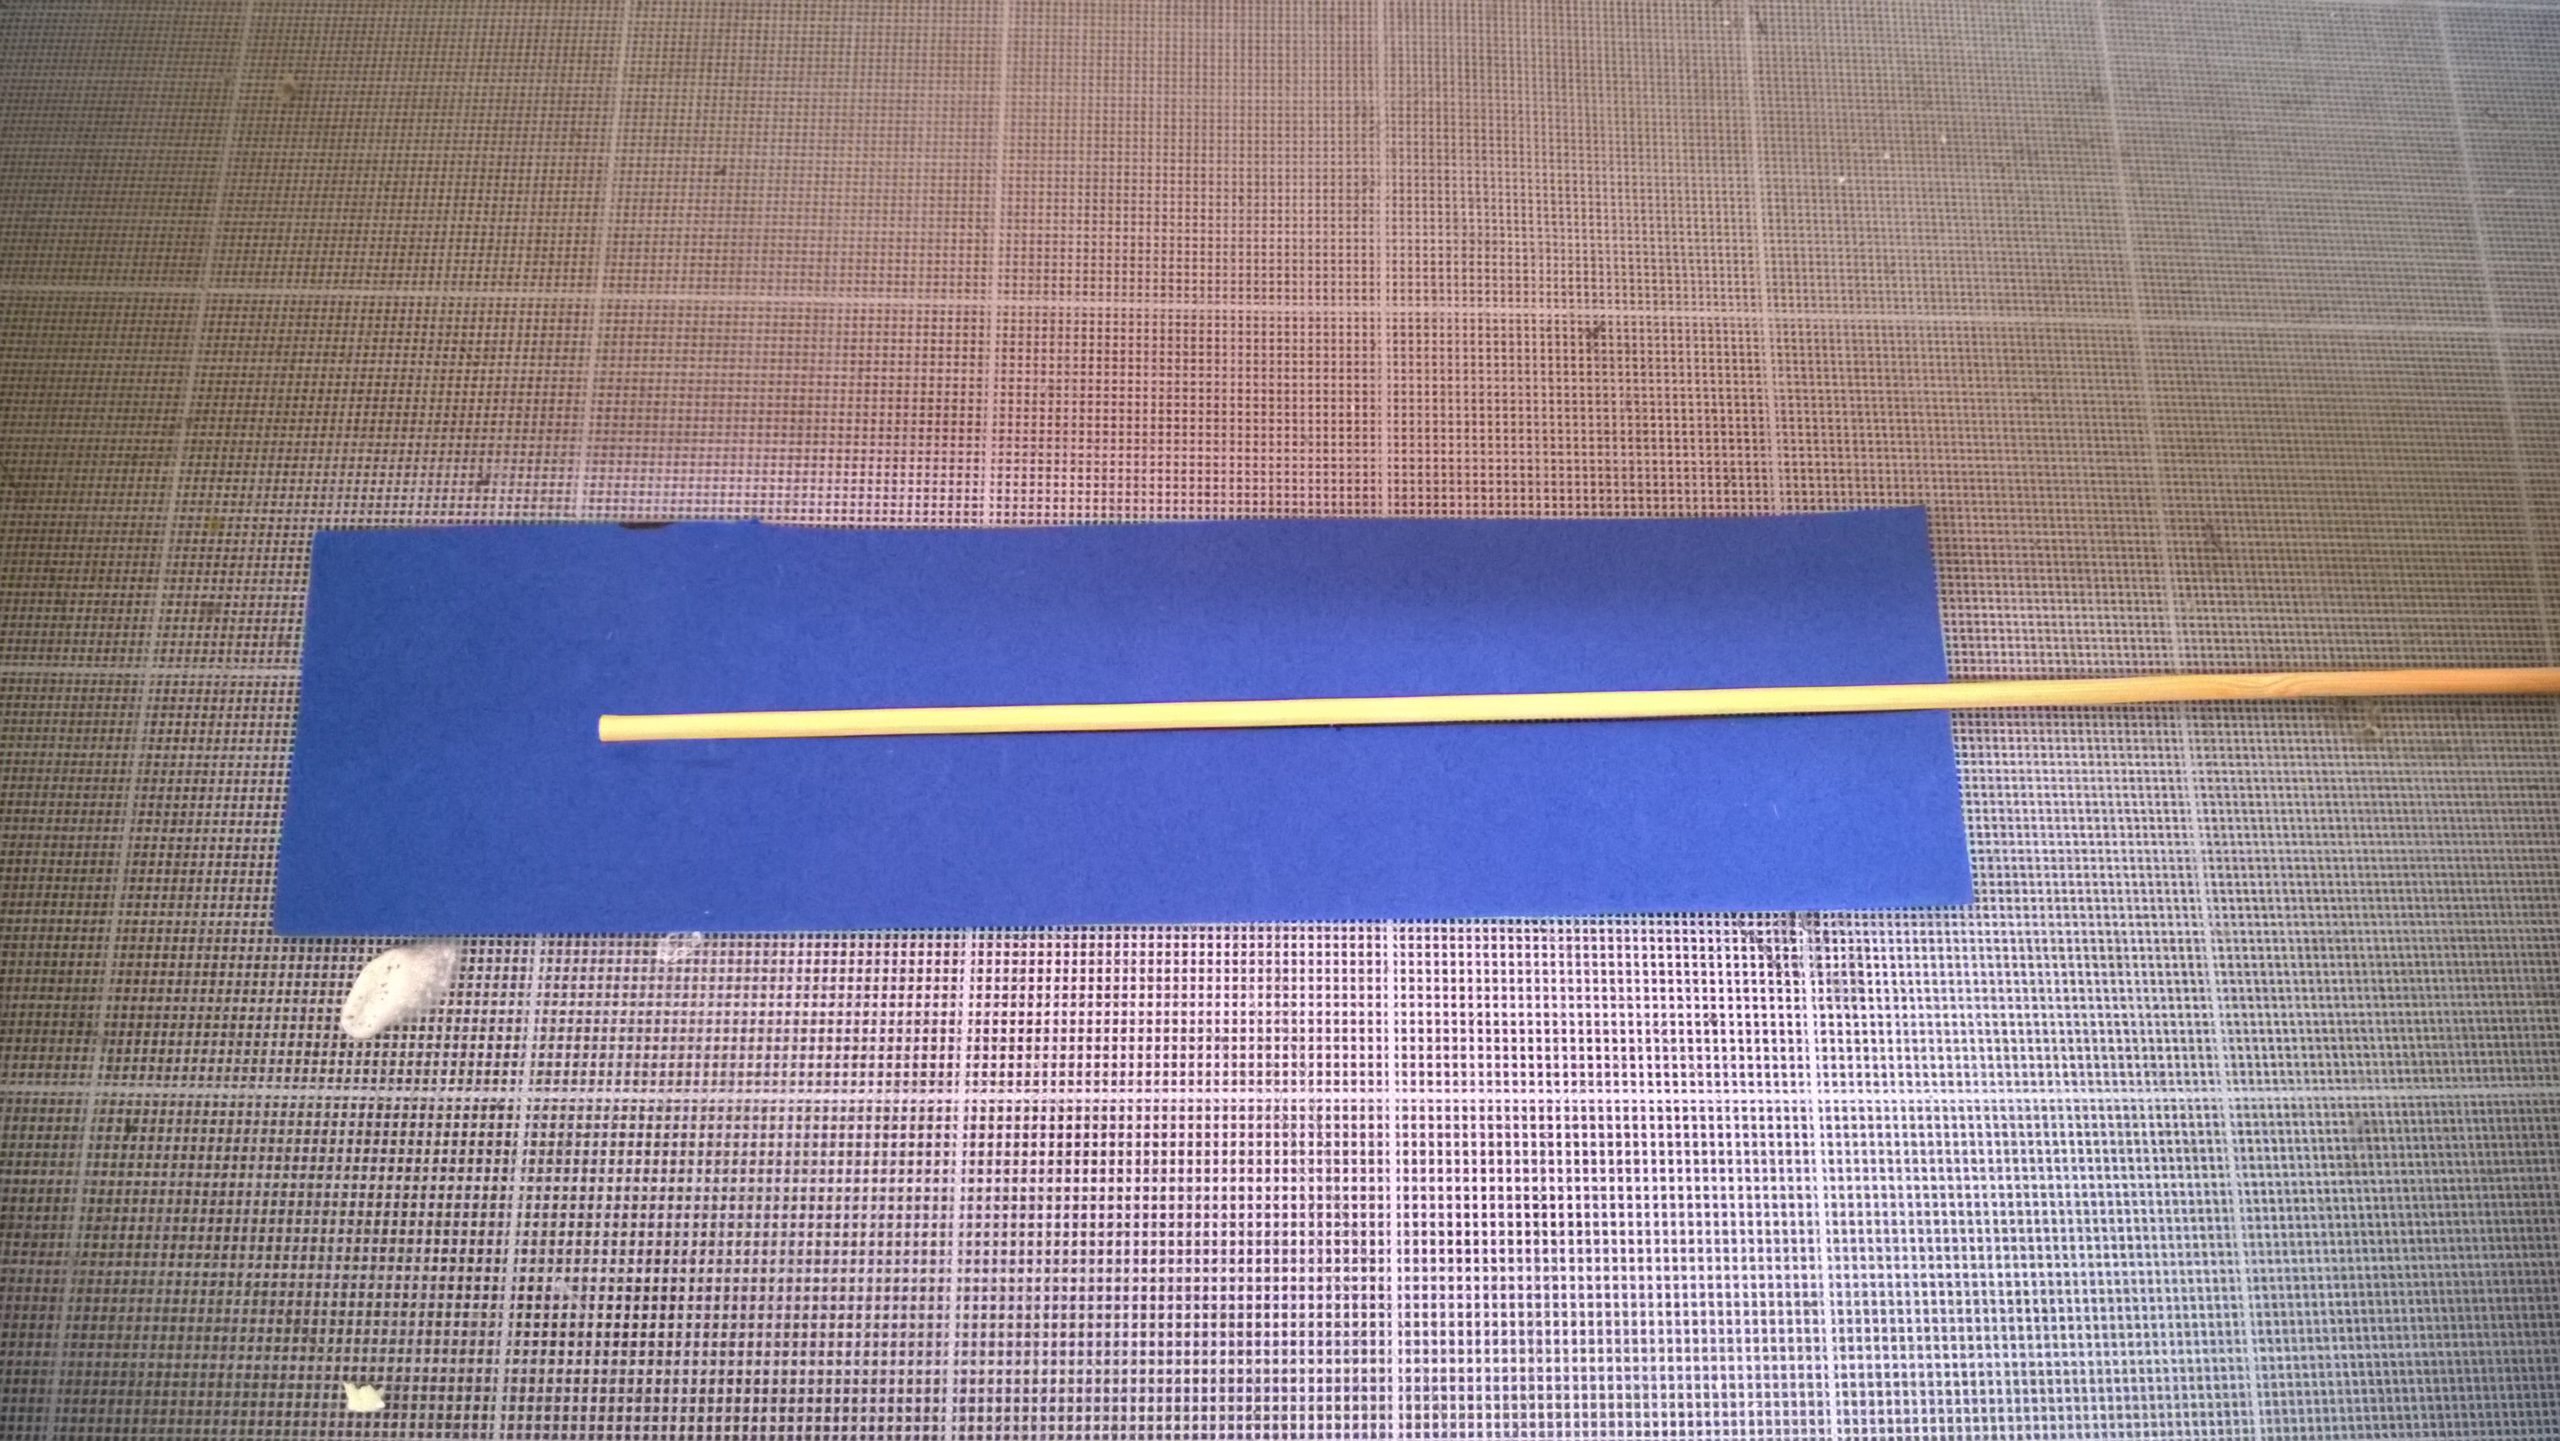
I cut a sheet of foam to the right size. I then cut a column of about 2mm in its center to put the wooden skewer in as the central axis for the feather.
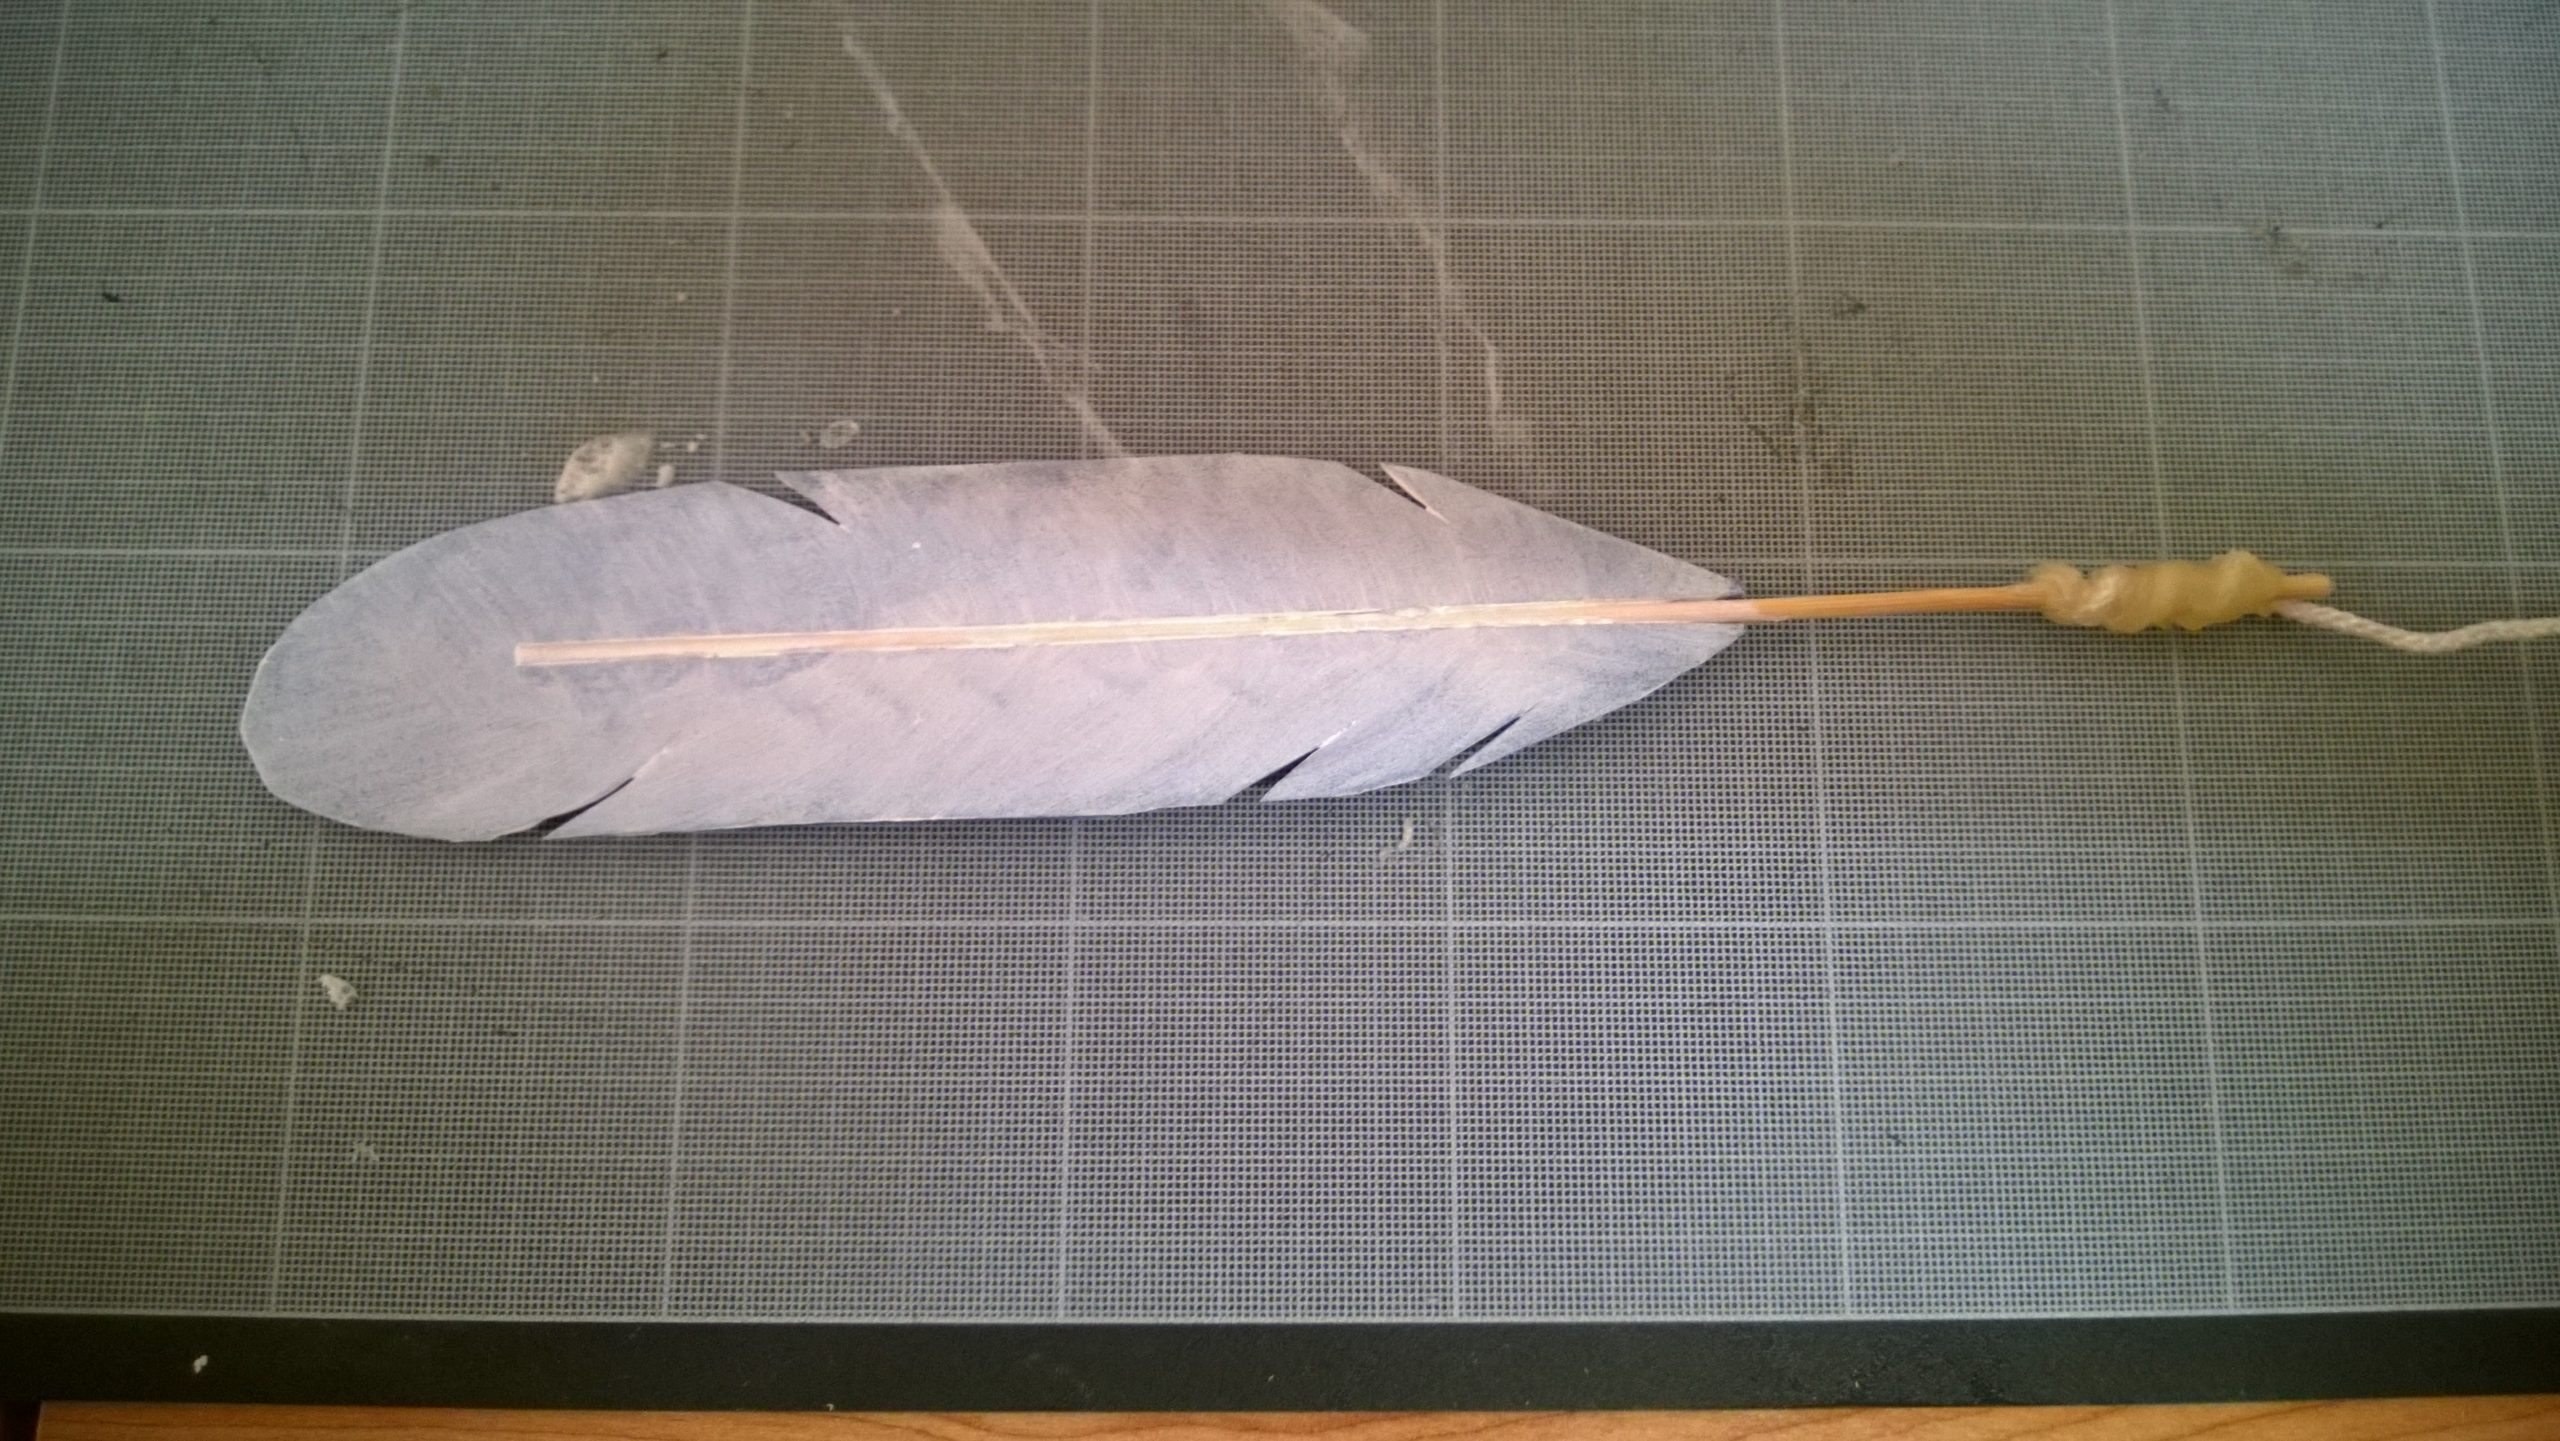
All that remains is to fix the string by wrapping it around the skewer and pouring a good amount of glue over it.

To the painting now; Just apply two coats of flexible paint (to avoid cracking when the feathers twist) then two layers of classic paint the color you want.
Now repeat the process a hundred times.
backpack. It will be easier to put the feathers on the wings then. It is enough to fix them with two SWNs, by the holes of the two ends of wood.
To keep the wings open, you can tighten both SWNs temporarily.
The longest task now is to fix the feathers well, and for the threads connecting each row of feathers, I must say it is all in how you feel it. You have to choose the angle that you think looks best between each feather so you will have a harmonious effect at the end. To avoid this thread from moving along the skewer, I put a point of hot glue each time.
Once each wing is assembled, the mechanisms must be hidden. This I made non removable: large sheets of rounded foam, over the whole, fixed with hot glue again. So be sure that your mechanism works great!

On this sheet of white foam are fixed the non-articulated feathers, those do not require too much effort: a good amount of glue and it is done. But be careful to adjust the position and the angle to keep the effect!
Now connect the two strings of the bag to the bottom of the arms of each wing and your wings are finished!
Although the mechanism is generally strong and functional, there are still some improvements that could be made:

Hi!
It has been added 🙂

Hey!
Where did you place the trigger that allowed for minimal movement to trigger the opening of the wings?
Hi !
I do not fully understand your question unfortunately. 🙁
The trigger (the cord) is attached to my hand, and I push forward with the force I need to open the wings at the desired place. (Push a little and open a little, push a lot and open full wing span)

Hi! First, these are gorgeous! You are so talented! Second, you are a genius! All the other tutorials I looked at called for pneumatics or hand cranks. I never thought of a pulley system! Thank you!!
I was wondering, is there any chance you could list the measurements of the wood? I tried using Solidwork (downloaded it just for this!) but i couldn’t figure out how to use it and I have a convention in two weeks! If there’s any chance you could tell me I would appreciate it so much!! Thank you for the tutorial!
~Q
Hey!
I’ll update the tutorial with a screenshot of the measurements soon 😉
Hi, I’ve been look for tutorials like this and finally i found here! Thank you for making this tutorial for readers, so may I ask some questions?
1, for the feathers, after apply all feathers on the positions, would it like crash together/stuck(cannot be fold) while folded?
2, other than wood material, can i use pvc or any plastic material to make it lighter?
3, can i shorter the length for the back (180 length wood part) to make it more smaller the part at the back?
Look forward for ur reply! Once again really good work!
Hi! I’m glad to see you like my tutorial 🙂
1 – If the string connecting all the feathers is correctly attached to each one, it should never get stuck. Mine never did at least. :p
2 – Yes I would advise using a lighter material but be aware that the whole structure has to support up to ~5 kg (high estimate to stay safe).
3 – Well you CAN if you want but you have to be careful in doing so because it will change EVERYTHING in the course of the wings. I cannot really tell exactly what will happen and where, but I just know that when I drew them I had to change the values little by little because any offset would change the look and feel of the opening course drastically.
So I’d advise to try your design on scrap/cheap material before using the costly one 🙂
Have a great day!
Hi!
Great design and tutorial! Forgive me if the answer is obvious but are the measurements in inches or centimeters or …? 🙂
Hello!
All the measurements on the design are in millimeters 🙂
Also “Diamètre” means “Diameter” (Super obvious but I figured I could make this comment 0.1% more useful).
Thank you so much! 😀

Wht I did was I just took the zero off and used it like that in inches lol, little log on the back but I mean. Oh well it will suffice lol
Sorry for the late reply, but mm ? Like, only 370mm long for the longest wooden piece ? Is that right ? It seems shorter than your pictures

Holy crap. You are awesome. You literally solved all of my problems. I have a dragon that I’m trying to make articulated wings for and could not find anything that didn’t include motors or pneumatics for the wing fed sign. I spent hours trying to jig something for opening and closing the wings and couldn’t figure out anything. Then I stumble across your thing and it’s perfect. Thank you so much.
Hello,
Thanks for the kind words! I wish you good luck on your build 🙂
Maybe I’m crazy doing this with only a month left to go, but my son wants to be X-men’s Angel (training costume, like the one from first class) for Halloween and we’re gonna DO THIS!!! You are awesome to share this information!! Thank you!!
Dizzyrizzy
IDAHO, USA
Hey good luck on your build and thanks for the kind words ! 🙂
Black Owl,
I’m well on my way to having my own wings, thanks to you, but I have a question for you! Is the longest feather that forms the tip of your wing, is it fixed so that when your wings open, the other feathers are tied to the fixed feather and open with it? If so, how did you fix that feather in place? It looks like they all hang from the vertical holes that your drilled, but when I watch the video of you opening the wings (again, and again, and again…I love this page!!), it seems like the outermost feather is fixed in position.
Thank you!
Dizzyrizzy
Hey!
Yes exactly the outermost feather is fixed so all the others are pulled by it via the string. 🙂
To fix it you can use pretty much anything that keeps stuff in place ;). My way of doing it was to use a metal wire in place of the wooden sticks for the middle of the feather, and knotting the feather tightly to the wooden wing frame. In hindsight it was a bit too fragile and I would advise you to use something thicker and also a strong glue to keep it on the frame, but its your call 🙂
Hope it helps!

Very nice !
Can I order from you?
I need a simple white angel articulated wings ^^’
Yes you can 🙂
Please send us an email at contact@blackowlstudio.com to discuss your needs in detail 🙂
I was wondering what the full wing span is for your fully opened wings? I am looking to make a raven with wings that can open as a companion animal for a costume I am making and want to adjust the sizes correctly for a realistically sized raven.
Hey !
I think my full wingspan is about 2 meters wide 🙂
If you change any measurement be sure to change them all accordingly so the mechanism stays proportional 😉
Good luck!
Hey,
This is awesome and a true life saver! I am trying to build one for my niece’s project!
Can you please provide the location of the screw holes – dimensions in mm?
Thanks!
R
Hello,
Thank you for the kind words 🙂
The screw holes are always 5mm away from the closest edge.
Good luck !

Hey there! I absolutely LOVE your wings and am currently starting to make my own. I’m just really confused with the pulley system. What connects to what and it would really help if you had some visuals but, if you don’t that’s okay too. Thanks,
-Ashley
Hi!
The 12th picture (click on any picture to scroll through them) is the visual you’re looking for. The whole pulley system is there.
I’ll run you through it to explain it as well as I can.
– Your arm is connected to the string at the bottom. On this photo the string is tied around a loop to keep the wings in the “open” position, but to open them manually you have to pull on this string.
– Since you pull the string with your left arm away from your body, the string comes from the left side of the backpack, hence the bottom pulley tied on the right and facing left.
– This pulley will transform your movement from “right-to-left” to “top-to-bottom”.
– The string is then split in two via a ring, and these two new string each go to one side. It makes one movement move the two wings.
– The two top pulley now invert the “top-to-bottom” movement to “bottom-to-top” on each side.
– The end of the string is attached to the lowest point on the wooden bar on each side. Moving this piece makes the whole wing move. The movement needed is a “bottom-to-top”, the one we just transformed with our pulleys 🙂
Hope it help, and good luck on your wings!
Thank you SOOOO much!! This really helped!
Hey I am making a nightmare moon costume so I have some questions. What kinda foam did u use, and if I was to paint them two different colors on the same feather (purple tips) is there any way I should do it (angle the paint or put the paint on in a pattern)
Hey there!
The foam we used is called Créamousse in french, but the specifications are fairly standard : a A4 sized sheet, 2mm thick, EVA foam. It comes in different colors.
I would recommend buying the foam directly matching the color you plan on wearing so you won’t have to suppress the background color when painting the foam.
I’m fairly sure that once you have a smooth surface you can paint it any way you like 🙂
Hey is it ok if I make a video of this? Oh and how much foam would you recommend for all of the feathers
Hey,
Yeah sure as long as you credit us there’s no problem 🙂
How much foam? well it’s hard to say but around two square meters if not a bit more…
Did you end up making that video, and if so, could you send me the link? Thanks!
hi!!!!
thank you for the tutorial and the mechanism its easy. now i can use the wings for may fantasy costume in pageant
more blessings and power
Thank you very much!

Thanks for figuring all this out and all the great documentation. One quick question, I was trying to replicate your model and I’m missing one dimension. What distance is the center pivot point in the 250mm member from either end?
Hi,
So I did update the article a while ago but forgot to update this one image. The distance you’re looking for is 8cm. It is not that important actually the only thing you need to do is keep this bar parallel to the one on it’s left. The gap could range from 10 to 2000 or whatever and it would work as long as it is parallel. 80mm just seemed harmonious when I drew it :).
Good luck !
Is there any way you could give the measurements of the feathers? Thanks for the awesome tutorial!
Hey!
Sorry, I have no idea about the length anymore. The very first was about one meter long and they gradually decreased as they approached the end of the wing…
You’ll have to tinker around and find your preferred shape. I would advise drawing a big wing like we did :). All of my measurements were based on it!
Good luck!
How tall are you? I want to make my wings proportionate. Also, what is the total length of one wing?
Hi,
I am 1,80m tall. And I think one wing is about 1,20m long but I could be wrong, it’s been a long time… 🙂
Hey! This is so cool! I was wondering if I could use a material other than foam for the feathers? such as feathers you can buy in a craft store? Thanks!
Hey!
Yes I think you can try using anything but be aware of how you put them on the frame, because if they get stuck in the folding point, they will eventually break when you use the wings.
My own wings have suffered greatly from this but luckily the foam holds up pretty well. It might be a different story for real feathers though…
Could I please see a clearer example of your rigging? (ropes, pullies, etc.) I cannot seem to get mine to function even though they are placed in the same location. The wings want to clamp shut rather than pull open. I am doing a non feathered variant. (canvas wing)
At the time we were in such a rush for Blizzcon that we really skipped a lot of the photo-taking. 🙁
Now when complete the underlying mechanism is almost invisible, which is good for use, but not for explaining how it works…
I can only try to explain further (which I did in another comment), and if you send me a picture I might be able to help. 🙂
Good luck!
2+ years later but I hope you can help. I’m also looking to use this tutorial for canvas rather than feathered wings and wanted to know how you attached the canvas (as opposed to the feathers on strings in the original tutorial). Did you sew a loop in the fabric and hang it like a curtain, that’s really my only idea without adding too many layers. My wings would be demon/dragon wings and I’d like the fabric to be lightweight enough for light to shine through a little when the wings are open.
Is this still functional with spray paint in silver? If so, great. If not, would you please recommend a silver paint (either spray or not) that would work? Thank You
Yes I think it will work just fine. 🙂
How much did everything cost you? (Just an average would be fine)
I think all in all it took about 60€ but it’s been a long time so I may not remember too well.
Thank you very much for this. Been playing with the idea of doing this for a long time. Got my supplies and getting to work on them this week.
Good luck !
Hey!! This looks like an amazing project and you did an amazing job with the tutorial. I am interested in making these and was wondering if you had any way (maybe a picture) to show how far the center pulley box part measures out from your back?
Also, how far do the wings span from outside feather tip to tip horizontally when closed?
Thanks, and good regards!!
The wing span is close to 2m if I remember right (it’s been a long time!)
I have no idea how far the pulley box is from my back, but i’d guess it’s not really relevant as long as you don’t offset it too much from your body.
Good luck with your wings 😉
Joris
could I make a skeleton version of this. And awesome designs. Could I use thick bendable wire? Awesome work and craftsmanship.
Brant.
Hey! This is awesome!! I’m building my first set of wings right now and this has been super helpful. I was wondering though how you keep them open between manual opening and closing?
Hi!
To keep them open you keep pulling the string. 🙂
It’s not too tiring because you can flex your elbow to block the string and (almost) stop using the muscles!
Have a nice day.
Joris
Oh I’m so glad I found this! I’m trying to find a way to make wings for my Castiel cosplay; and here is my question: Is there any other way to use the wings without cutting your clothes? I don’t want to cut my trench coat… But at the same time I have no idea how to hide everything… I don’t mind that much if the back part is showing, but at least hiding the front would be nice =x
Oh you’ll have to be creative then :p
My guess is that you’ll always have to have a cut somewhere if you want to hide as much as possible 🙂
Good luck and RIP your trenchcoat 😀
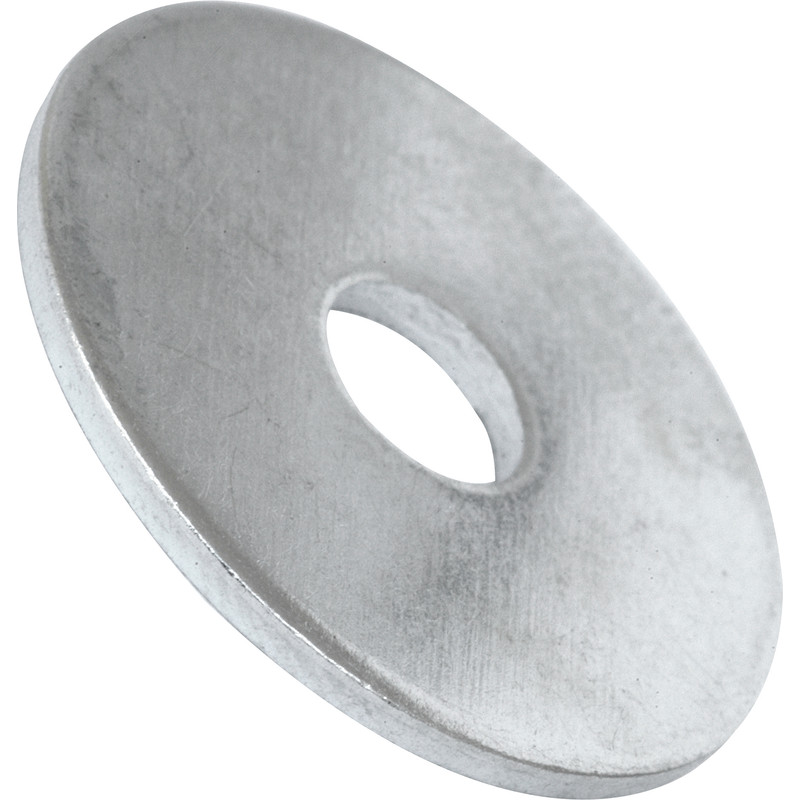
good evening, I am wondering if you can include the picture for the joint rings. I am having trouble looking it up in the local hardware. your tutorial is cool btw, it was really easy to understand.
Hi,
Actually they are called washers, I’ll update the tutorial with the right term.
Here a picture : https://cdn.aws.toolstation.com/images/141020-UK/800/94063.jpg
You don’t need that one specifically, but one with a big enough internal diameter to pass the cord into twice.
Good luck 🙂
Hello, I was wondering, about how thick is the entire setup? I’m doing a Pit cosplay and want to know if I could easily hide it under the tunic without looking bulky. Thanks!
Hi,
The thickness about 10cm i’d say. It looks pretty flat when fully opened in my opinion.

I was wondering if there was a way to keep one wing stationary, since my character’s wing is permanently broken
Yes you would have to suppress one string and have the other pull up the one wing when moving your arm. To block the other wing up you really just have to tighten the screws that articulate the wood pieces 🙂
Hello!
Ive been following your tutorial for a while now, and I’m rather confused.
I’m doing the feathers right and and have installed my first two. But the use of string to secure it to the frame makes them seem floppy.
I know in your improvement you mentioned a sturdier placement?
I’m not sure where to go from here.
Is there any way you could explain how to attach the feathers further?
Thank you!
Yes at first I thought it was sketchy too but when the wing is fully assembled it stays in place pretty well. And this freedom of movement also makes them look more natural I think 🙂
Hey! I currently trying to create my own wings and im following your tutorial. However i am a bit confused about how wide the planks are you used?
You say in the material list 4×4, is that in cm? And later on you say you cut them 20mm wide, is that 20mm on both sides?
Thank you!
I’m planning to make wings for a doll. This was really helpful thank you!!!
Can I buy a set of wings? Black? If so how much would it cost?
Hi! I have a question, if I were to order a set of wings from you how much would it cost?
How much dose it cost to buy a pair of wings?
Do you think it would work to use Chicago screws instead of screws & bolts?
Hi! I’m really glad I found this. Trying to make wings for a Gabriel cosplay for my daughter. The foam color she is requesting is golden brown. Where did you buy your foam? I cannot find any sheets in this color online. Thanks so much!
Hi! I have a question, in the drawing with the measeurments, what scale are you using? Cm?
Hey There, about to start on my own set for a gift. Everything seems to be very clear in your tutorial except I’m having trouble understanding one part. I don’t see a picture showing exactly how all of the feathers are fixed to the one on the end so that they are pulled into place. Are you able to elaborate on that process for me?
I understand the pulley system and all, but confused on the strong mechanics of the feathers.
Hi! I was wondering how many feathers you used in total?
Hi! I’m currently trying to make a set of wings based on this tutorial, and the framework turned out perfect, but I’m having a lot of issues with the feathers bunching up and not sitting correctly when moved, can you give a simplified method of how you did the wings?
Hey, I’m going to be doing a cosplay using wing following your tutorialbut instead of a bag I’m going to make a harness. What length would you recommend the wood being for the back plate in this case?

hi!
i would really like to know if it would work if i use other types of feathers?
Thank you for making this tutorial. it reall helped me in our play at school.
Out of curiosity:
1 How big should the individual feathers be?
2 How long can a project like this realistically be expected to take?
Bonjour! J’ai un question aussi!
Would it be at all possible to manage to make a similar system w/ some tweaking w/o the requirement of a backpack type system? I’m sure that’s an obvious yes but considering you’ve already gone through this process I figured I’d ask.
Merci beaucoup!
Do you happen to remember what the opened wingspan was? I need to scale it down so I can do a set of wings for a raven puppet. Thank you.
Hi there – thank you so much for this detailed tutorial. I am going to attempt making my own wings, thanks to your help! I have a couple questions for you:
1. Sticking to the foam material for the feathers, would adding real feathers by glueing both sides of the foam end up effecting the movement/design of the assembly?
2. Can you elaborate if you used glue or only the flexible paint to keep the skewer attached inside the cut out column I’m the middle of the foam?
Thank you, I really appreciate your time!
Nyada
Do you think that using fake feathers would work as well as foam ones, and if so how many do you need? also, how durable is this setup? could I use it for multiple days? last question, how heavy is this setup? sometimes my back bothers me and I can’t carry very heavy things
Im making a pair of black raven wings for a raven warrior costume I am doing and the is super helpful. Also, would balsa wood work for the wings? I’m wanting the wings about 70 inches from tip to tip.
I am making a pir of black wings for a reven warrior costume i am doing and this is super helpful. Also would balsa wood work for the frame, I am wanting the about 70 inches from tip to tip.
Sorry, comment duplicate was an accident
And its supposed to be raven not reven

hey, the costume im doing has one wing broken (as in like almost completely cut off. not a broken bone.)
is there a way i can even out the weight without it being too bulky? i dont really care if it moves or not. i just dont wna to be leaning to the side or anything 😛
Hey! I was wondering if you had any ideas how this could be modified to be butterfly wings?

You’re wings look awesome and I know this article was made like 3 years ago but if you do still respond to comments I was wondering how long it took you to make this (preferably estimated in hours) and how much it costed for all the materials. Thanks in advance
This template is so freaking awesome!!!!!!! I love to make my own Halloween costumes and I can’t wait to make this for this year!!!!!
hi! this may be a bit odd, but do you think this could potentially work for just one wing? i have plans to cosplay Sephiroth at some point, and while right now i’m undecided as to whether i wanna do wing(s), i think it might be kinda cool if i could include it! ^_^
What are the Measurements in? 370 cm equals 145 inches?
are the wings triggered by pulling a string? because I can’t really tell from the picture.
I stumbled across your website in my search for articulating wings. Thank you for sharing your tutorial and journey making it.
These are great! I’m wanting to build a similar set for a production my daughter’s school is doing. It’s they’re any way to have the measurements converted to metric or even imperial? I’m having trouble finding the actual measurements. Thank you!
love the wings! what are the exact measurements for the skeleton/frame? (the wood)
This look really good, but also looks very complicated to built for first timer, don’t have any friend who have this kind of skills to help me, thx for sharing. hope 1 day can built one my own
Could you show the front when you open it please? It would really help explain the pulley system. Looking forward to a reply!

Thanks for the more in depth approach. I looked for tutorials but they only showed part of the creative process so you were left on you own device at one point or another. Ive made my plan and prototypes to build my wings and it’s going well!
When I showed people how i figured all that out I referred to your website and they were really impressed by what it takes to make that kind of prop :p.
Cesar F Monzon
Hello i just wanted to know if you could provide a full materials list i really would like to do something of this effect for our school play.